Krikey AI Help Center
This is the Krikey AI Animation Help Center where you can learn how to animate, how to use AI Animation tools, make custom character AI 3D avatars and more.
Welcome to the complete Krikey AI Animation product tutorial. Whether you are a small business owner, an educator, a podcaster, or a content creator, this guide provides step-by-step instructions to help you master our AI-powered animation tools.
What is Krikey AI?
Krikey AI is a 3D Animation Maker tool that empowers anyone to create an AI character and animate a talking or singing character in seconds. With AI Text to Animation you can generate a video and then use the Krikey Video Editor tools to edit the script, change the voice AI dialogue, customize the character, personalize the video backgrounds and more. You can export MP4 video files, GIFs, PNG images and FBX files. View Krikey AI subscription and pricing.
How to Animate with Krikey AI?
In this section we will explore every button in the Krikey AI Video Editor.
1. Getting Started: Accessing the Editor
To begin your animation journey, follow these initial steps:
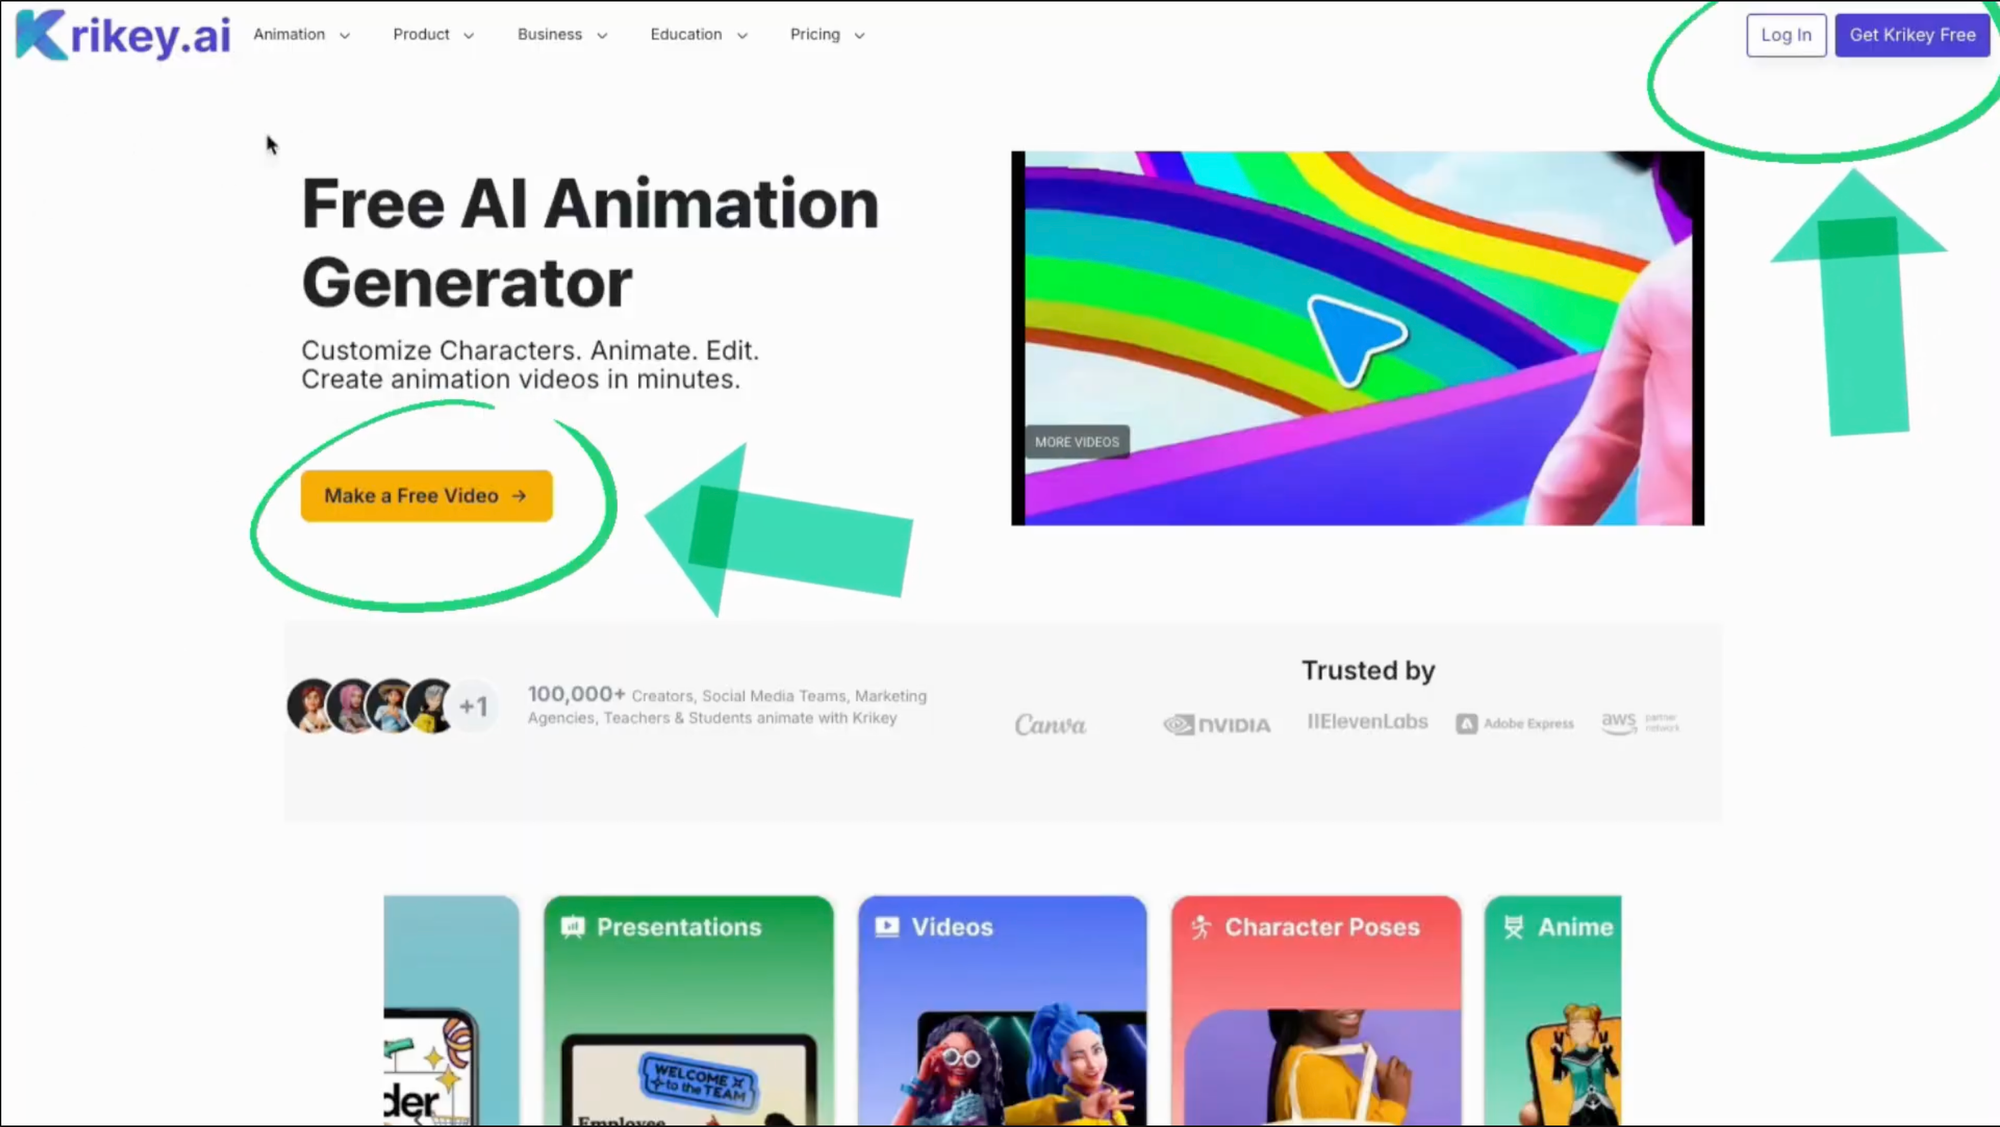
- Visit the Website: Navigate to krikey.ai.
- Authentication: Sign in for free with your email address. The tool is free to start, and once logged in, you will be directed immediately to the Video Editor. You can start your free trial there. (Or click the button below!)
Sign Up/Log In: Click "Make a Free Video" or "Log In" at the top right of the homepage.
2. Creating or Selecting Your Character
The character is the heart of your video. You have two primary ways to get started:
Option A: AI Character Creation (Custom)
- Step 1: Click on "AI Character Creation."
- Step 2: Upload a photo of yourself or a brand mascot.
- Step 3: Choose a style: Anime, Cartoon, or K-pop.
- Step 4: Click Create. The AI will generate a 3D model. Note: This process can take up to 10 minutes depending on complexity.
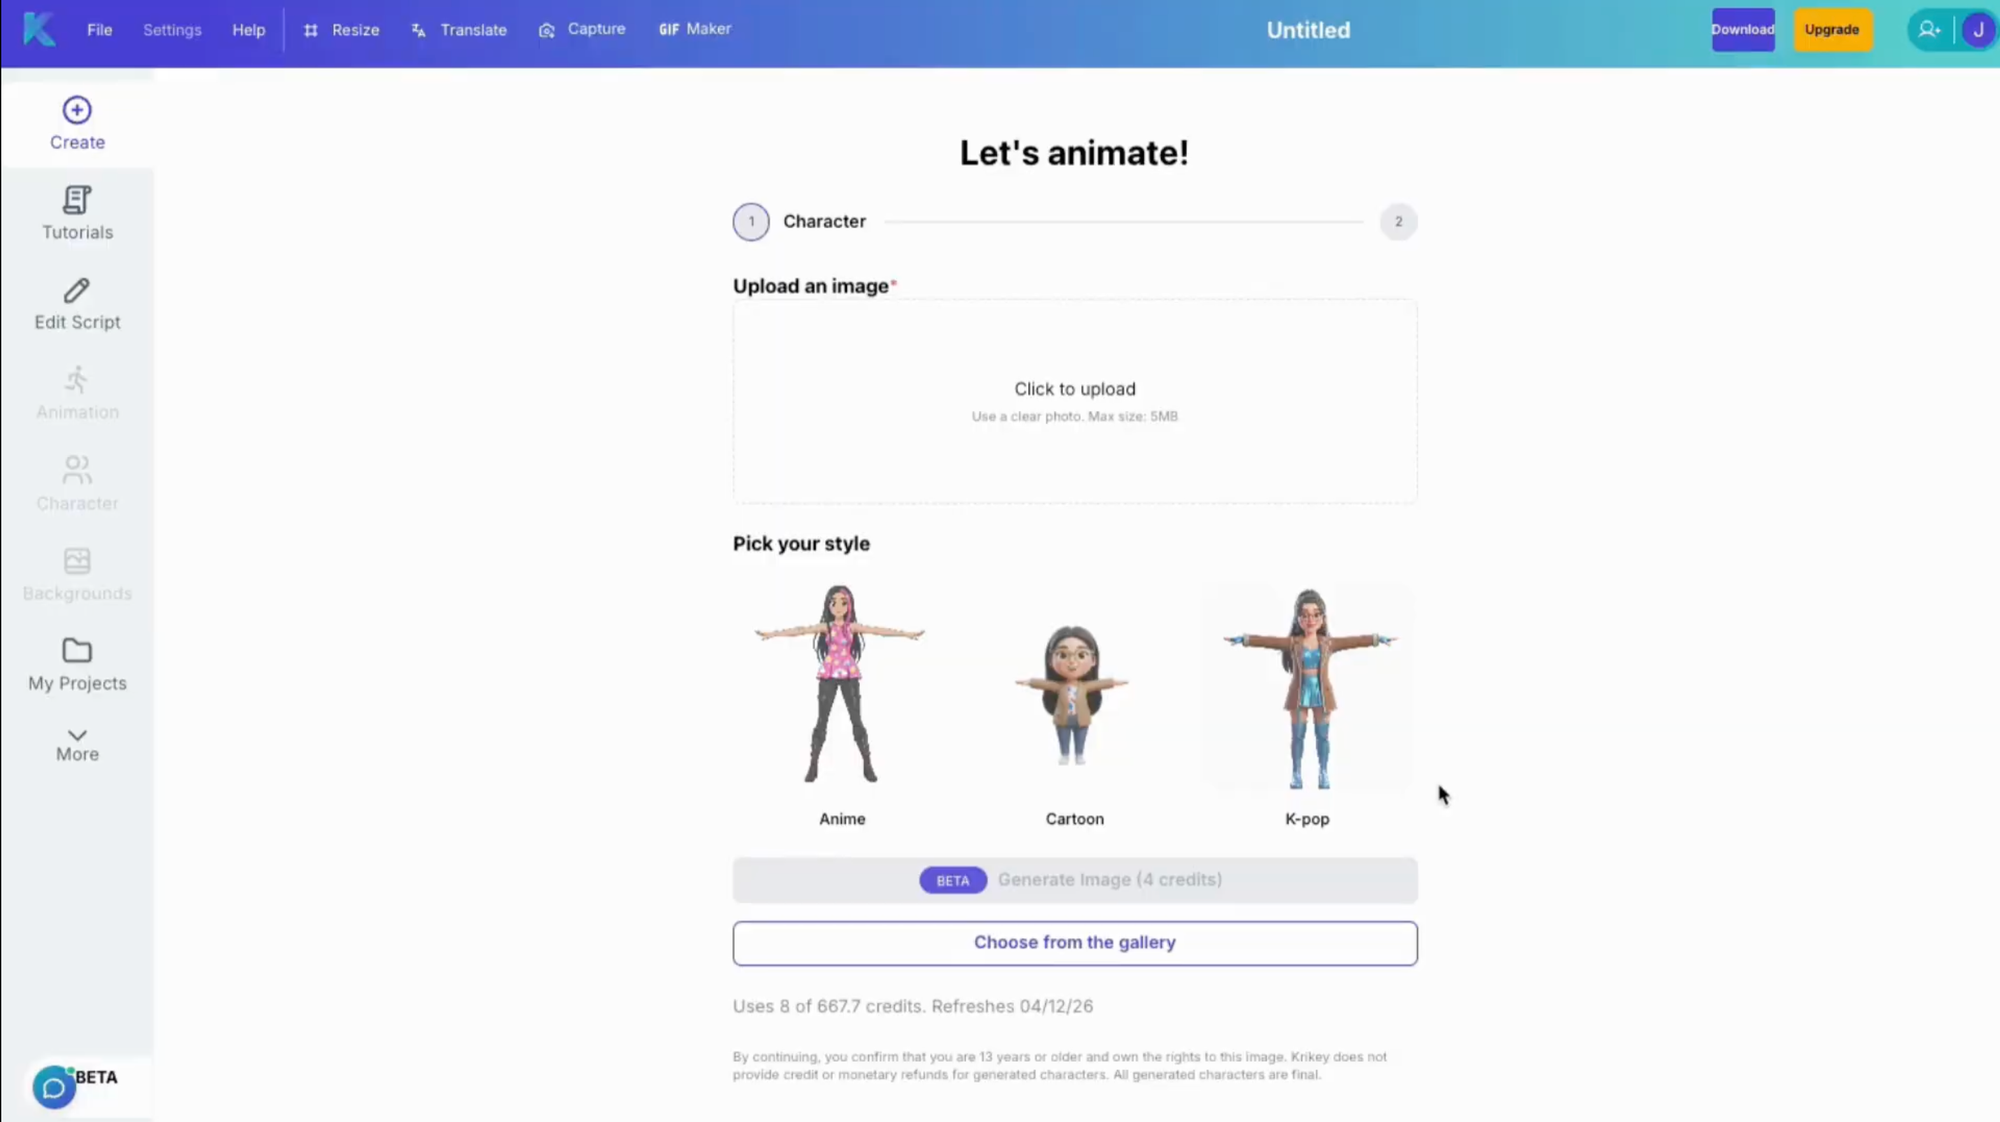
Option B: Choose from the Gallery (Instant)
- Step 1: Click "Choose from the Gallery."
- Step 2: Scroll through the pre-made library (including ducks, cows, and various human avatars).
- Step 3: Select your character to move to the project type selection.
3. Choosing Your Project Path
Once your character is selected, you must decide what kind of content you are creating:
A. Talking Avatar Videos
Perfect for explainer videos, lesson plans, or HR welcomes.
- Describe Your Video: In the text box, explain what the video is about (e.g., "A teacher named Annie introducing herself to students").
- Define the Audience: State who the video is for to help the AI tailor the script.
- Select Categories: Choose animation styles like "Explainer" or "Presentation." You can X-out styles that don't fit (like "Jump Zone").
- Select a Voice: Browse the voice library, click to preview, and select the one that fits your character’s persona.
- Generate: Click "Generate My Video" to create the script and motion automatically.
B. AI Music Videos
Create catchy, animated songs in seconds.
- Enter Music Prompt: Use the structure: [Genre] + [Vocals] + [Topic].
- Example: "Reggae song, male vocals, about how to create a tutorial video in three steps."
- Refine Animations: Select animation packs (e.g., "Disco," "Teaching," or "Professor") to influence how the character moves.
- Set Duration: Use the toggle bar to set the length (up to 15 seconds or more).
- Enable Lyrics: Check the "Include song lyrics" box to ensure the character lip-syncs to the music.
- Generate: Click "Generate My Music Video."

4. Advanced Editing Tools
Krikey AI provides a "Full Service Kit" inside the browser—no downloads required.
Smart vs. Manual Mode
- Krikey has two modes: Smart and Manual
- In smart mode, you can use the AI Chat Agent to make edits to your project
- In manual mode, you can use additional controls to edit your project.
You can switch between smart and manual mode by clicking on the toggle on the top right hand side of the screen.
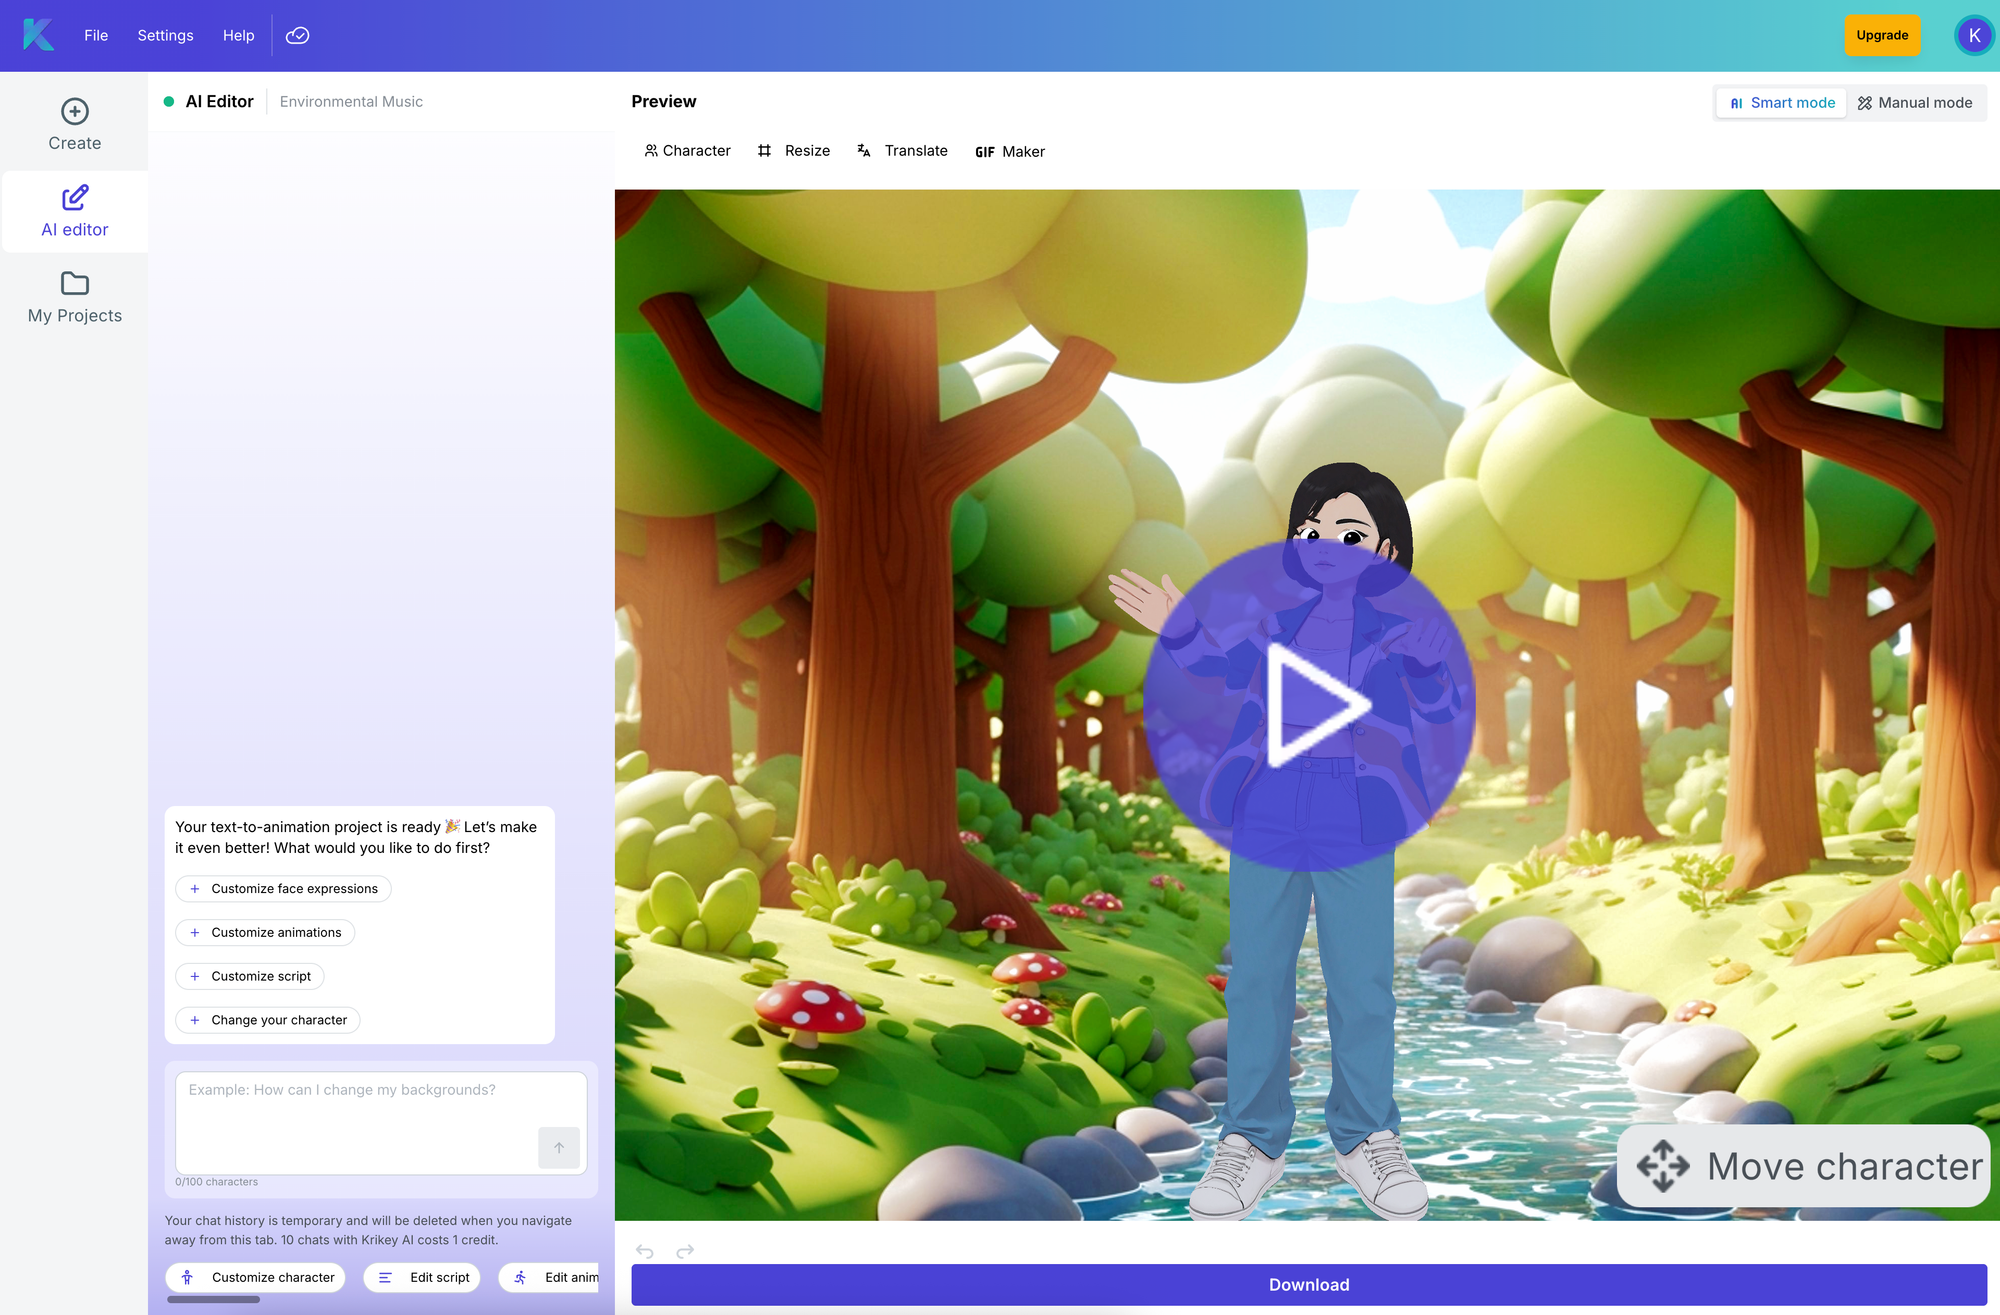
The AI Chat Agent (Beta) - Smart Mode
Located in the purple box/bottom left, this allows you to edit using natural language:
- Customize Face: Click "Customize Face Expressions" and select an icon (e.g., "Happy") to make your character smile.
- Customize Animations: Click "Customize Animations," select the specific clip you want to change, and browse the pack library to replace it.
- Customize Backgrounds: Select the background you wish to change. You can:
- AI Generate: Type a prompt (e.g., "3D cartoon park with rolling green hills").
- Upload: Use your own image.
- 3D Environments: Choose a pre-made 3D scene like a "Rainbow" background.
The Top Navigation Bar
File Menu
Go back to your dashboard, save projects, or download videos.
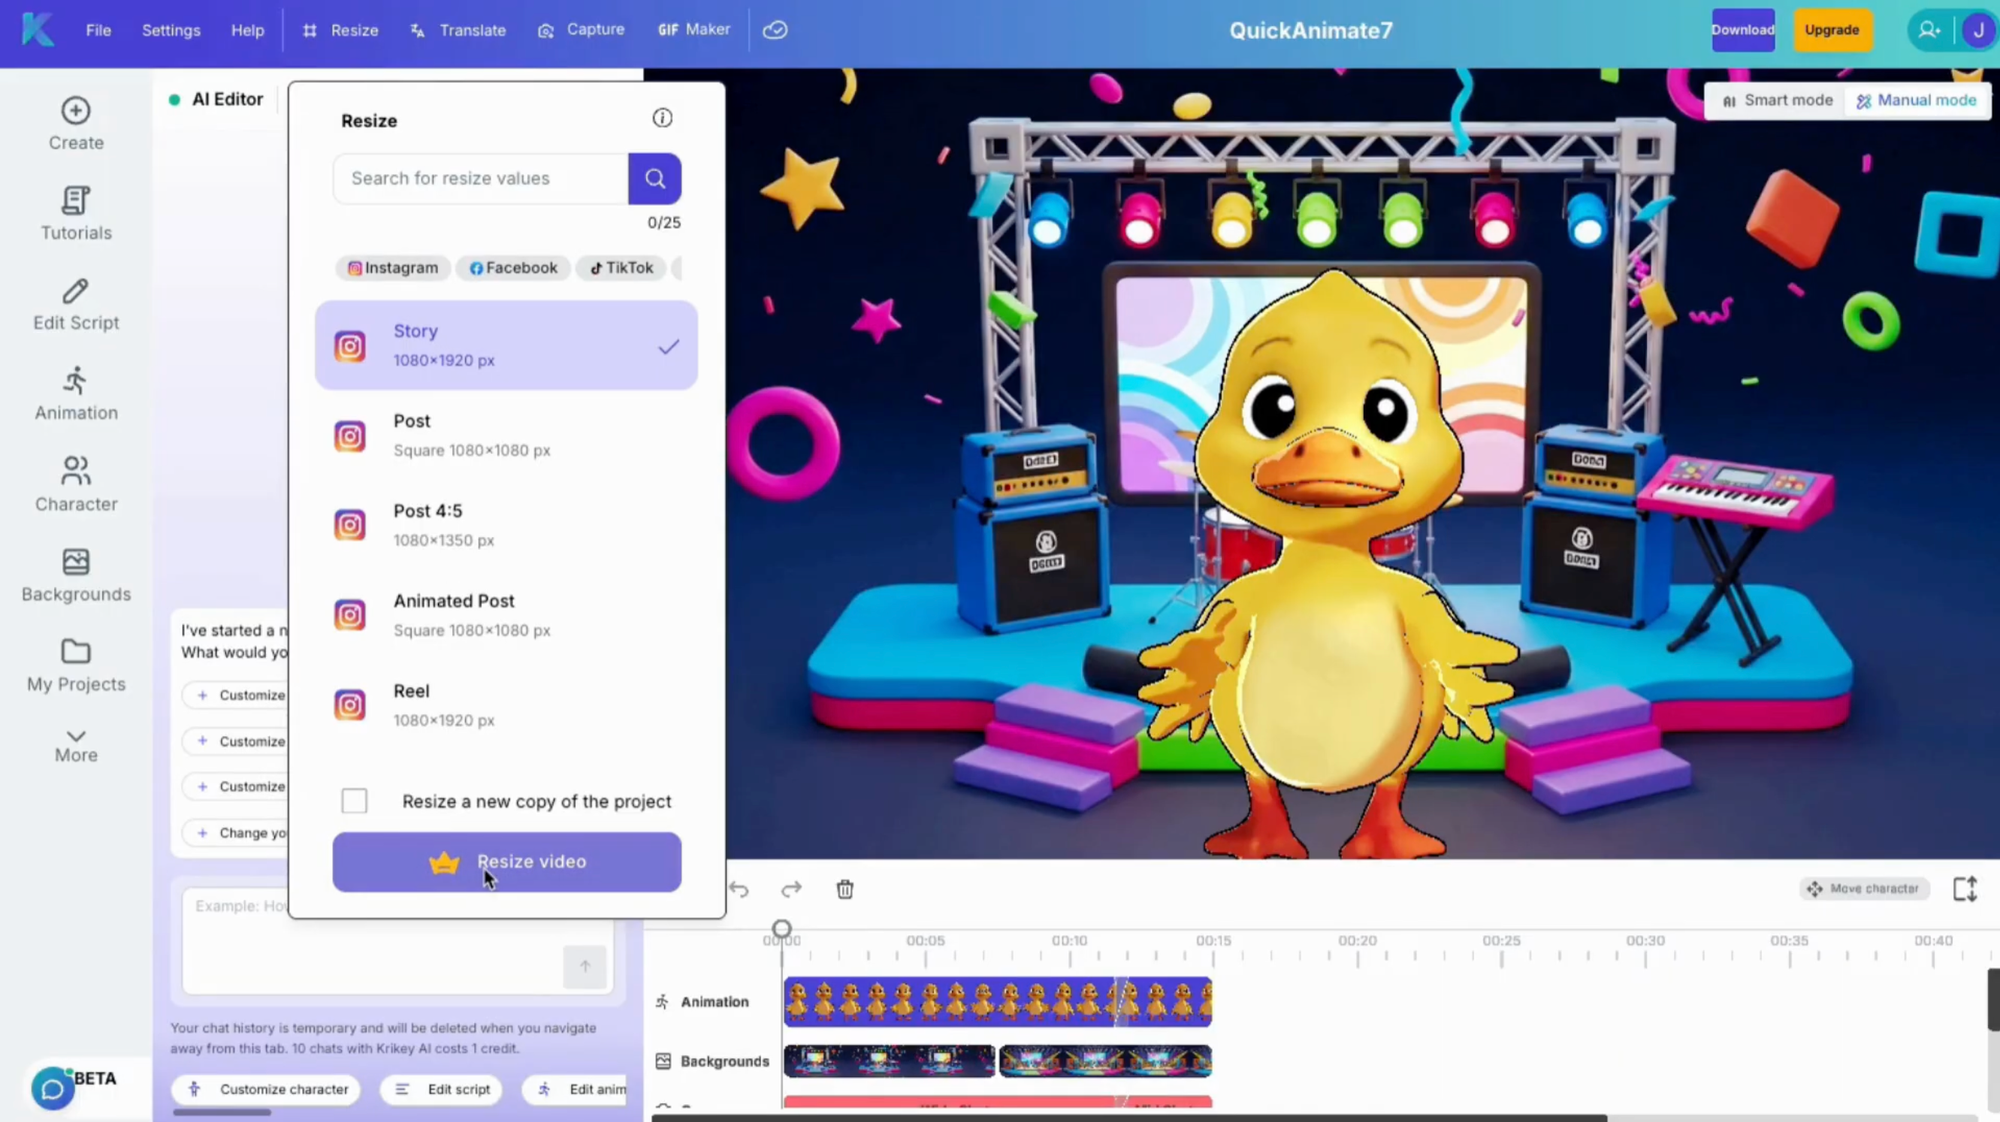
Resize for Social Media
Click the aspect ratio icons (e.g., Story mode). Vertical bars will appear to help you ensure your character stays within the frame for TikTok or Instagram. To access the resize menu you can click on the word 'Resize' in the top navigation bar – or you can also access it from the 'Download' button.
In the resize menu, you can search for the canvas size you need or browse our presets by social media platform - Instagram square, LinkedIn Post, YouTube video, etc., All of the media sizes are pre-loaded and you can click any one to immediately resize your animated video.
Once you select an option, you will see grey bars on the sides or top and bottom of your video. This indicates how your video will be cropped to fit the resize request. Before downloading your video, please play it back to confirm it has all the elements within the frame. If you need to make small edits, this is the best time to do it - before exporting!
Then you can follow the steps off the Download button to download your Resize video in any aspect ratio you selected.
Quick Translate
Select any language and a new voice to instantly translate your entire video project. Here's a deeper look at the steps to use the Quick Translate Feature:
- To access the Quick Translate menu, you can go to the top horizontal navigation bar and click the word 'Translate'.
- Here you can select the language, voice AI style and also preview the sound of the AI Voice. Check the box to generate the translation in a new copy of your project. If you do not check the box, it will over write the dialogue track in your existing project.
- We recommend checking the box if you are trying to make multiple copies of the same project in different languages using Quick Translate.
- Once you have selected your language and voice AI style, click the purple button that says Quick Translate. Within seconds you will have an animated video with your exact dialogue, translated into a language of your choice - all with perfect lip sync.
- There is also an option to edit script before translating and below that in this box you can see how many credits will be used each time you click Quick Translate. The credits bar shows how many credits a Quick Translate button click action costs, as well as how many credits you have left and also when your credits refresh (if you are on a subscription plan).
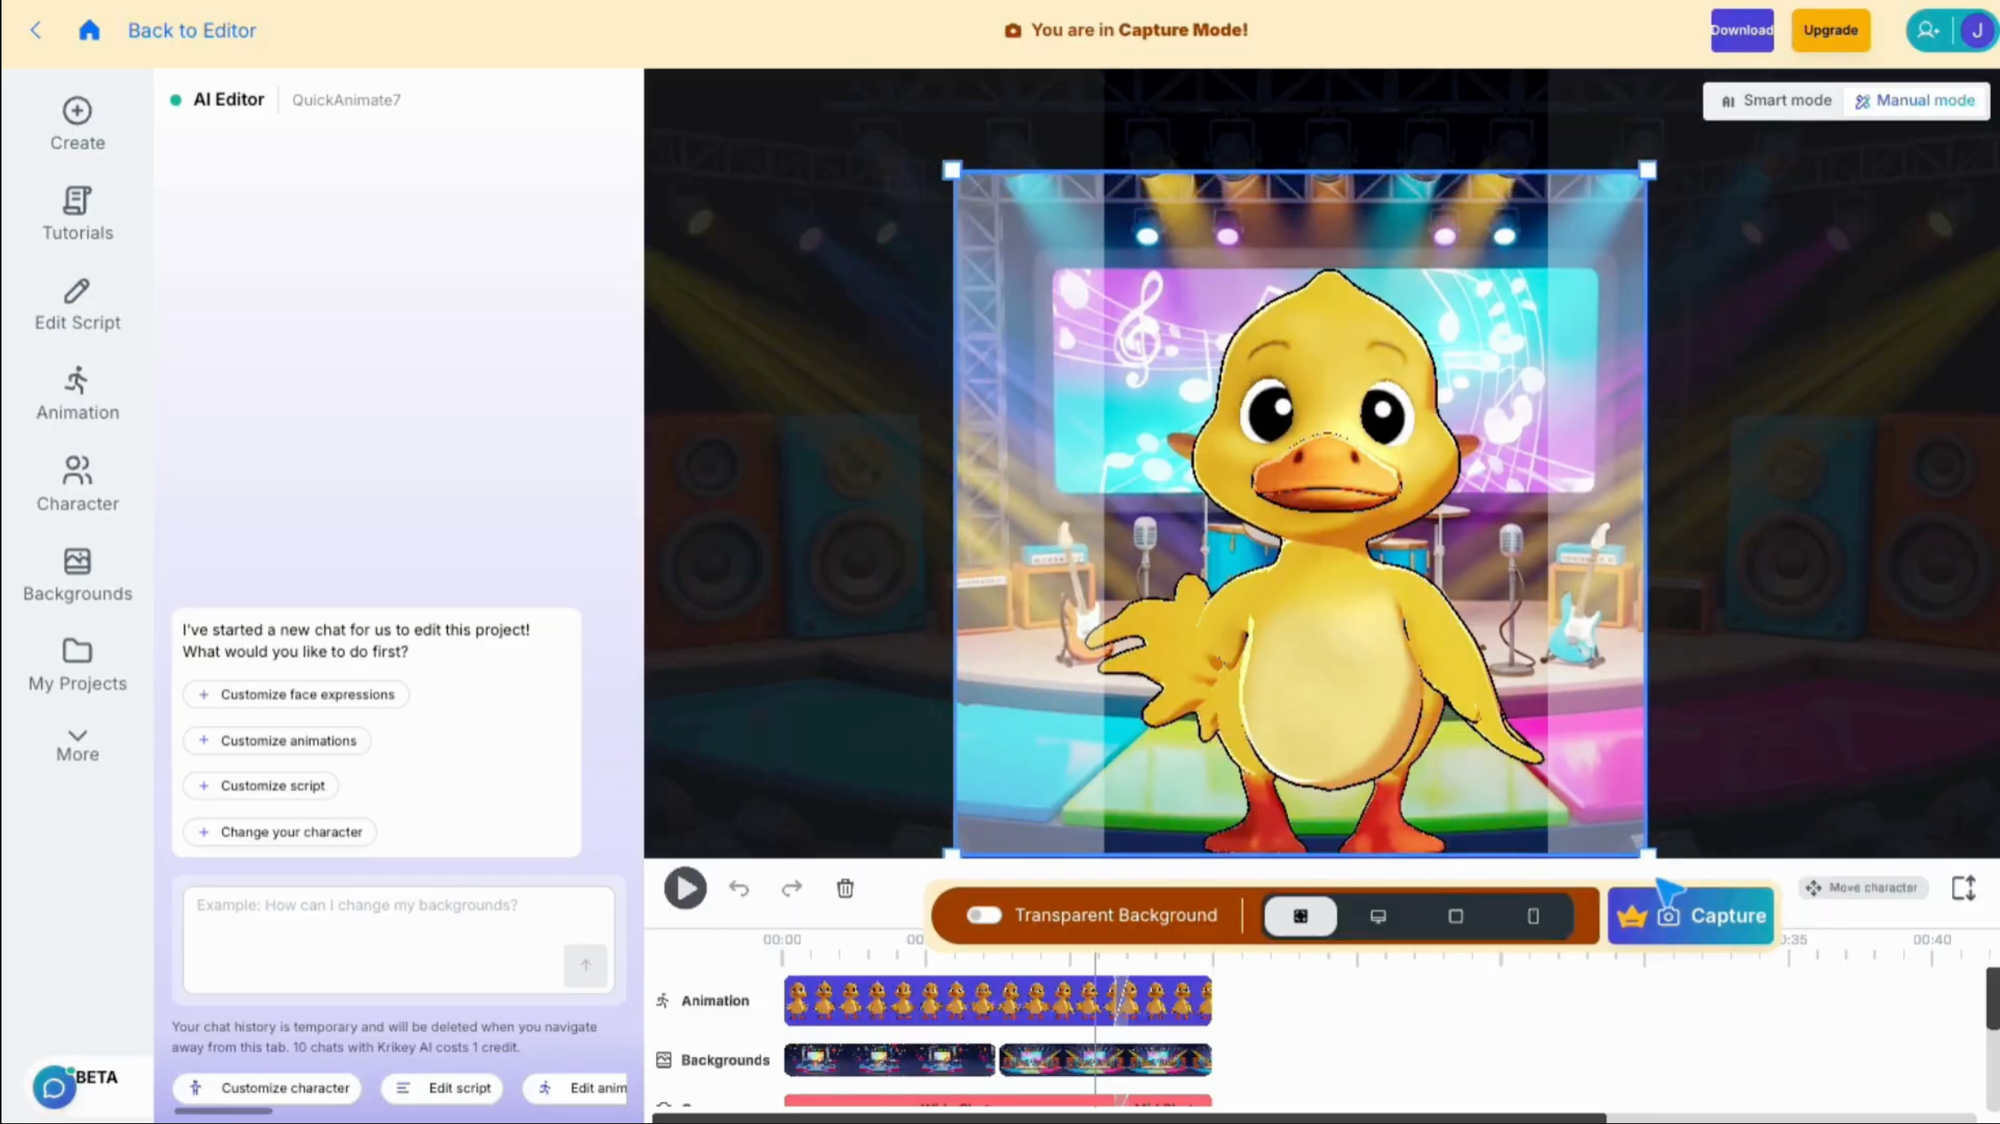
Capture Mode
Use capture mode to create high quality character poses from any animation. Here’s how to use capture mode:
- 1. Click "Capture Mode."
- 2. Drag the selection box over your character.
- 3. Select "Transparent Background."
- 4. Hit "Capture" to get a high-res PNG for presentations or websites.
Transparent GIFs
Use transparent GIFs to create high quality character GIFs from any animation. Here’s how to use transparent GIF download:
- Access the GIF icon from the top navigation bar
- Select a character
- Select an animation
- Download a transparent looping GIF of your character
Collaboration
Working with a team? You can collaborate inside the video editor and edit a project together! To access the collaboration feature, click the human icon on the top right of the video editor. There is a tiny toggle on the top right of the collaboration box, toggle that on and then enter your team member or friend's email in the big box. Select their access (ie; 'Can View' or 'Can Edit') then you can click 'Invite'. Once they accept, you will be able to see their cursor in your video editor on that specific project and you can both edit together.
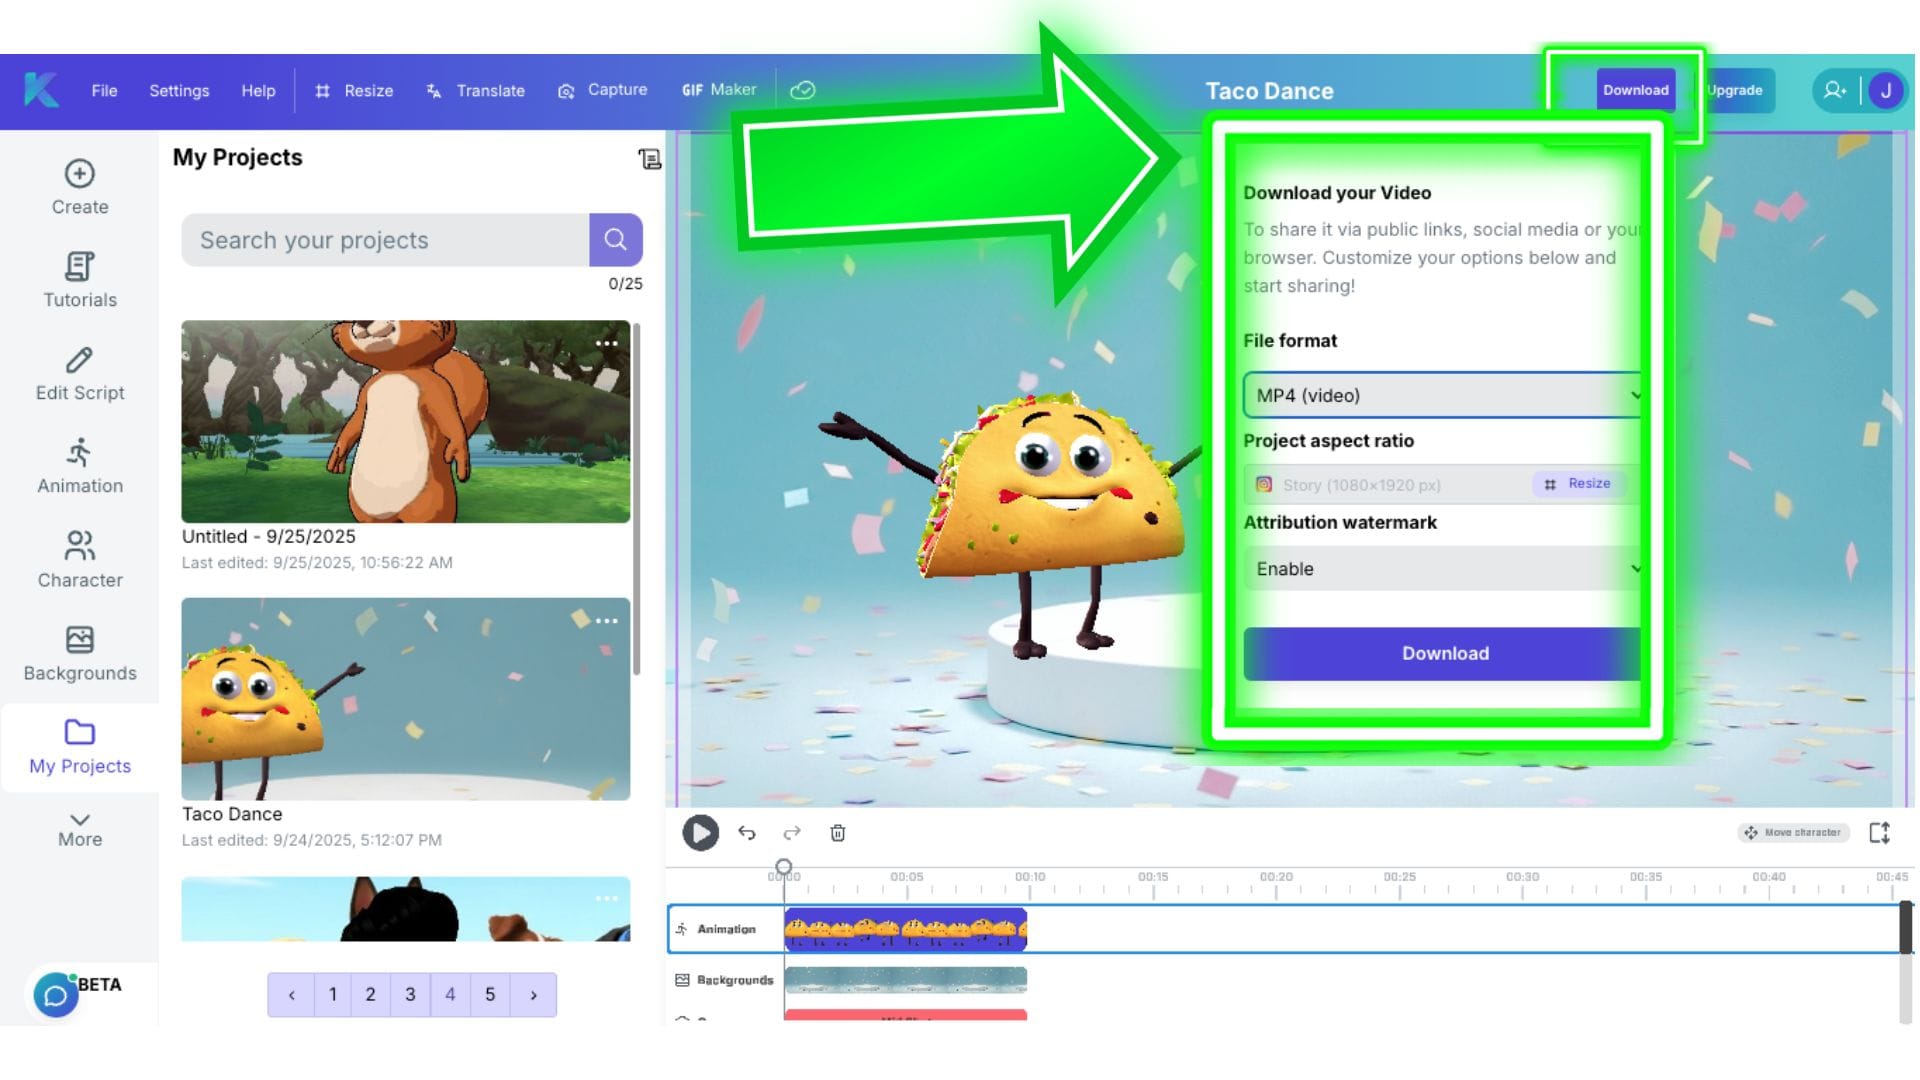
Exporting Your Content - Video Download
When you are happy with your animated video, you can go to the top right of the video editor and click 'Download'. Here, you can select from a dropdown menu of MP4, GIF or FBX file. If you would like to download a high resolution still image of your character, you will need to go to the Capture icon in the top bar.
Below those options, you have the choice to 'Resize' your project. Clicking on the word 'Resize' will open that dropdown menu so you can choose if you want a vertical video, horizontal video or any other size for different social media platforms.
The last option in the download menu is whether to enable or disable the watermark on your video. This is available only when you are on a paid subscription plan with Krikey AI.
To summarize, when your masterpiece is finished:
- HD Preview: Toggle on "Enable HD Recording" to see the final high-definition filter.
- Download: Click the Download button at the top right.
- Choose Format: Select Video (MP4), GIF, or FBX (for use in game engines like Unity or Unreal).
5. Using the Timeline Editor - Manual Mode
For creators who want total control, the Timeline Editor on the right allows you to adjust:
- Animations: Drag and drop new motions from the library.
- Camera Angles: Switch between Wide Shots and Mid-Shots to add cinematic flair.
- Lighting: Change between Three-Point lighting or other atmospheric presets.
- Present Mode: 1. Click the "Present" icon.2. Upload an image (like a slide deck).3. Choose a frame (Laptop, Mobile Phone, or Projector).4. Use the 3D sliders to rotate, scale, and position the device next to your character.
In manual mode, you can also access the following menus on the left bar:
- Tutorials
- Magic Studio
- Animation
- Character
- Backgrounds
- My Projects
- Present
- Audio
- Face
- Hands
- Effects
- Filters
Tutorials
To access tutorials, just click the Tutorials button on the left hand bar of icons inside the Krikey Video Editor.
Clicking this icon on the left bar will open a list of tutorial videos that you can explore. These can help you learn how to customize characters, edit audio, change video backgrounds and more. You can also explore tutorials on our YouTube Channel here:
Edit Script
To access Magic Studio to write your script and generate Voice AI dialogue or to edit dialogue in your existing video, just click the Edit Script button on the left hand bar of icons inside the Krikey Video Editor.
Clicking this icon will open the Magic Studio Toolkit in the Krikey Video Editor. Here you can edit your script, choose a language and voice AI style, then click generate. This will generate a new audio dialogue track for whichever project you select. If you have not yet made a project, we recommend you use the 'Talking Avatar Video' tool first to make a template, then come to Magic Studio to edit script and dialogue.
In the script box in Magic Studio you can choose to assign text to either Character or Narrator. Character means the character will lip sync the text and speak it as dialogue. Narrator means the character will not lip sync and it is treated as voiceover.
If you'd like to upload your own audio file with your voice as character or narrator, we will cover this later in the Help Guide - in the Audio section.
Here’s a list of all available languages ready for use with Voice AI tools in the Krikey AI Animation Video Editor:
- Arabic
- Bulgarian
- Cantonese
- Catalan
- Croatian
- Czech
- Danish
- Dutch
- English
- Filipino
- Finish
- French
- German
- Greek
- Hindi
- Icelandic
- Indonesian
- Italian
- Japanese
- Korean
- Malay
- Mandarin chinese
- Norwegian
- Polish
- Portuguese
- Romanian
- Russian
- Slovak
- Spanish
- Swedish
- Tamil
- Turkish
- Ukranian
- Welsh
Animation
To access the animations in the Krikey AI Video Editor, click on the Animation icon in the left side of the Krikey Video Editor.
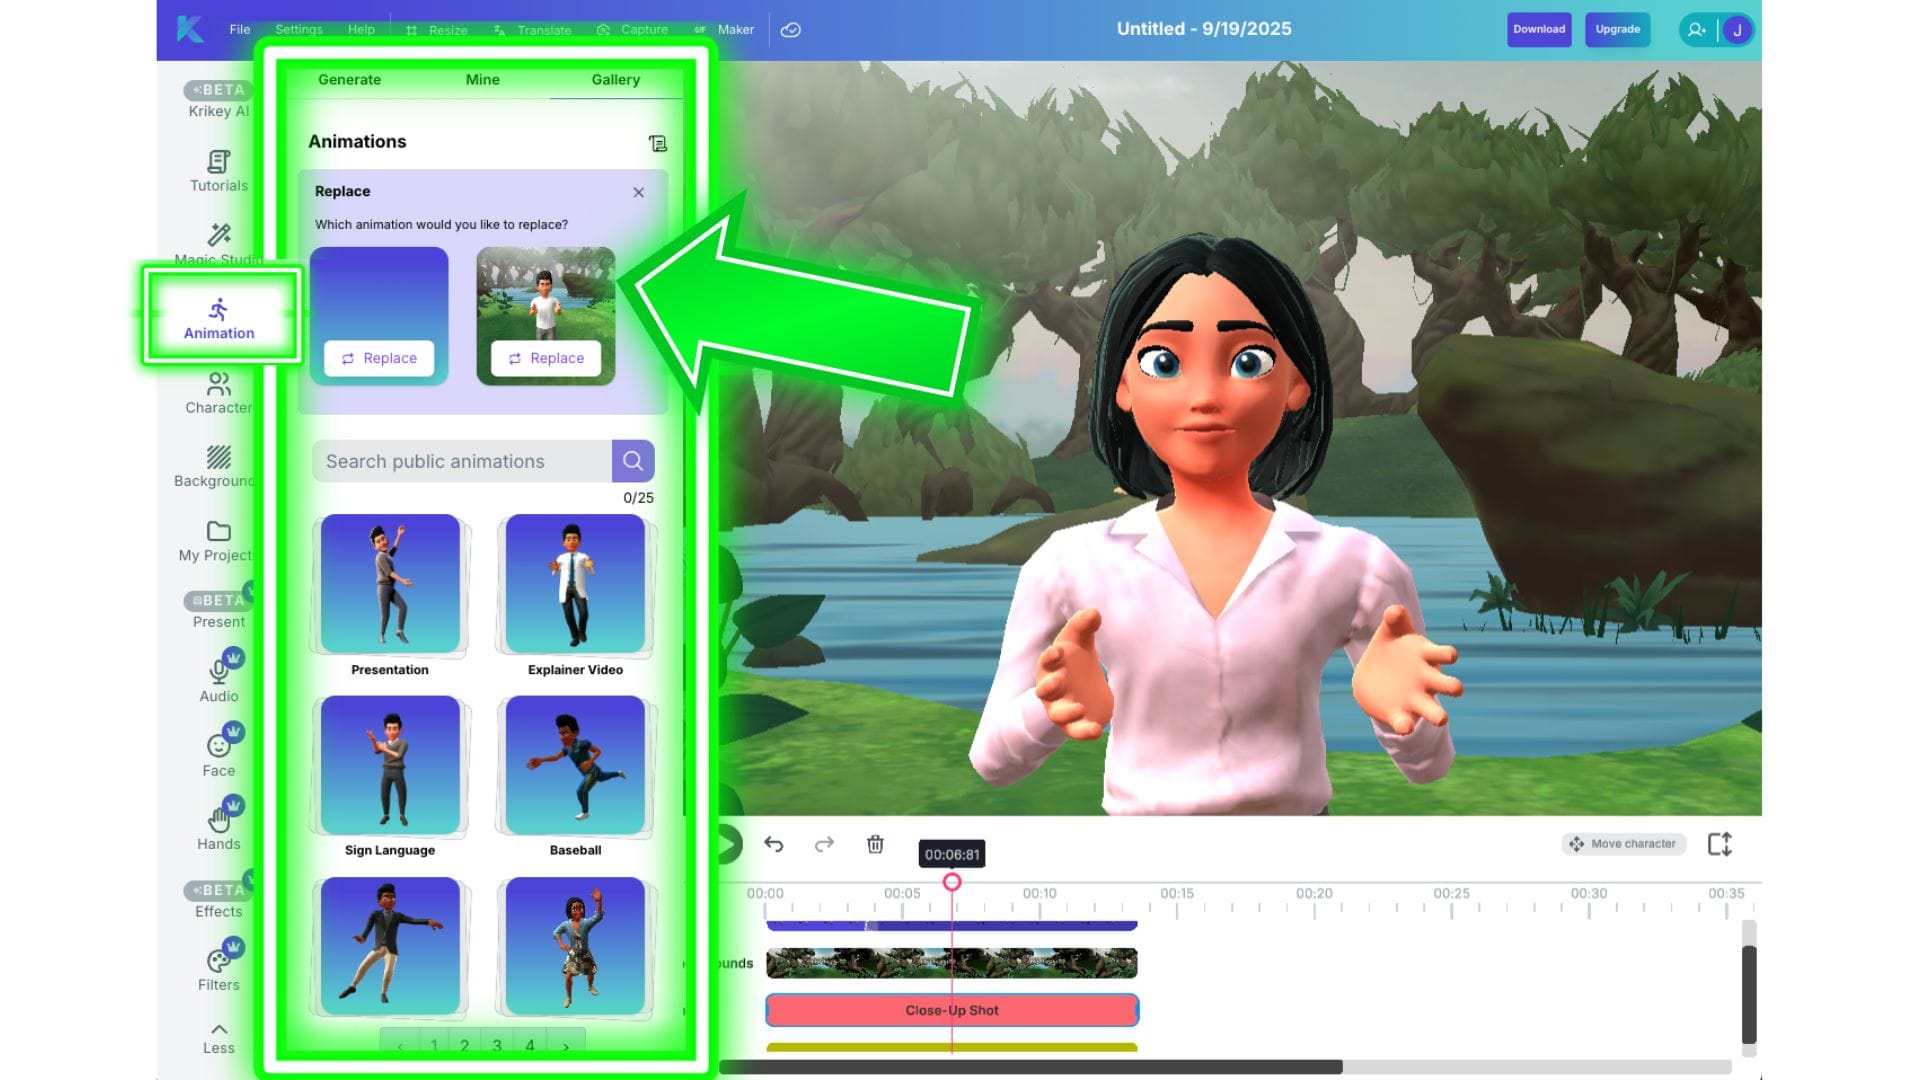
Here you will find three options:
Gallery
The Krikey AI Animation gallery contains a library of animations - from presentation and teaching animations to Bollywood dance, Scottish Highland dance, different walk cycles and more. You can search for an animation and hover on the tile to see what it looks like.
To add an animation to timeline:
- Click on the animation tile
- It will automatically get added to the timeline on the right
- You can play back the animation and edit camera angles, character pose etc.,
To add multiple animations to timeline, remember to connect them. When using animations in a sequence, you can transition them smoothly. For smooth transitions between animations:
- Have two or more animations lined next to each other on the timeline.
- Drag the end of the animation to overlap the animation next to it. A grey box with a diagonal line will appear to indicate they are being transitioned.
- Dragging the end of the animation farther or shorter will make the transition longer or shorter.
Generate
This section contains our AI Video to Animation tool. To use this you can upload a video, for example of someone dancing, and turn it into an animation. This process just takes body motion and applies it to any character in the Krikey AI tool.
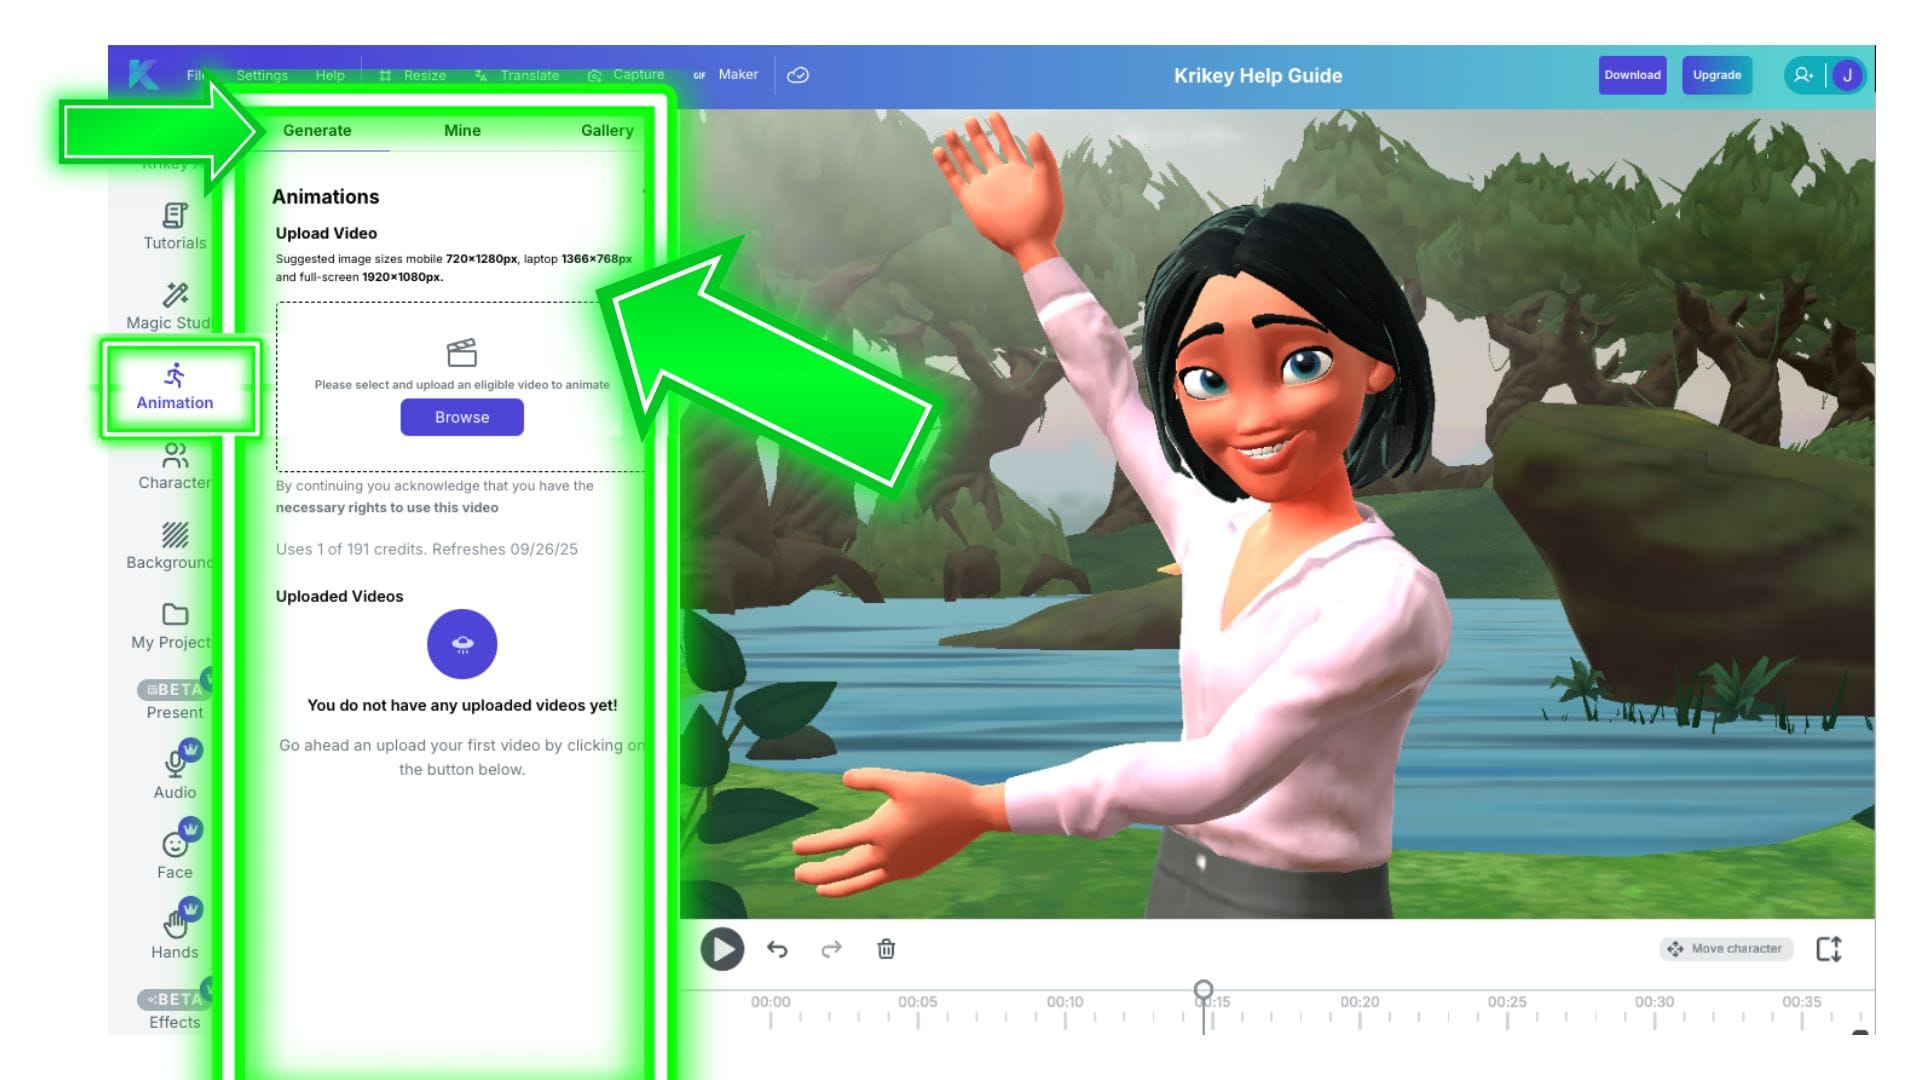
To generate a custom AI Video to Animation:
- Click Browse and select a video file you want to turn into an animation. Hover over the blue i and make sure your video fits the requirements to convert to animation.
- Once your video has been uploaded, you will see your video with the subject(s) highlighted in a colored box.
- Click on Figure Selection and pick the colored box with the movements you want animated.
- Select whether or not you want Animation Smoothing.
- Click Generate to make a custom Animation
Please note this tool is focused on animation - body motion - not character customization. To customize your characters, please visit the Character section in the Help Guide. Our AI Video to Animation tool can help you generate personalized animations to use in your project - similar to markerless motion capture.
Mine
Your generated animations will be in the Mine tab. Click on the animation to add it to your timeline.
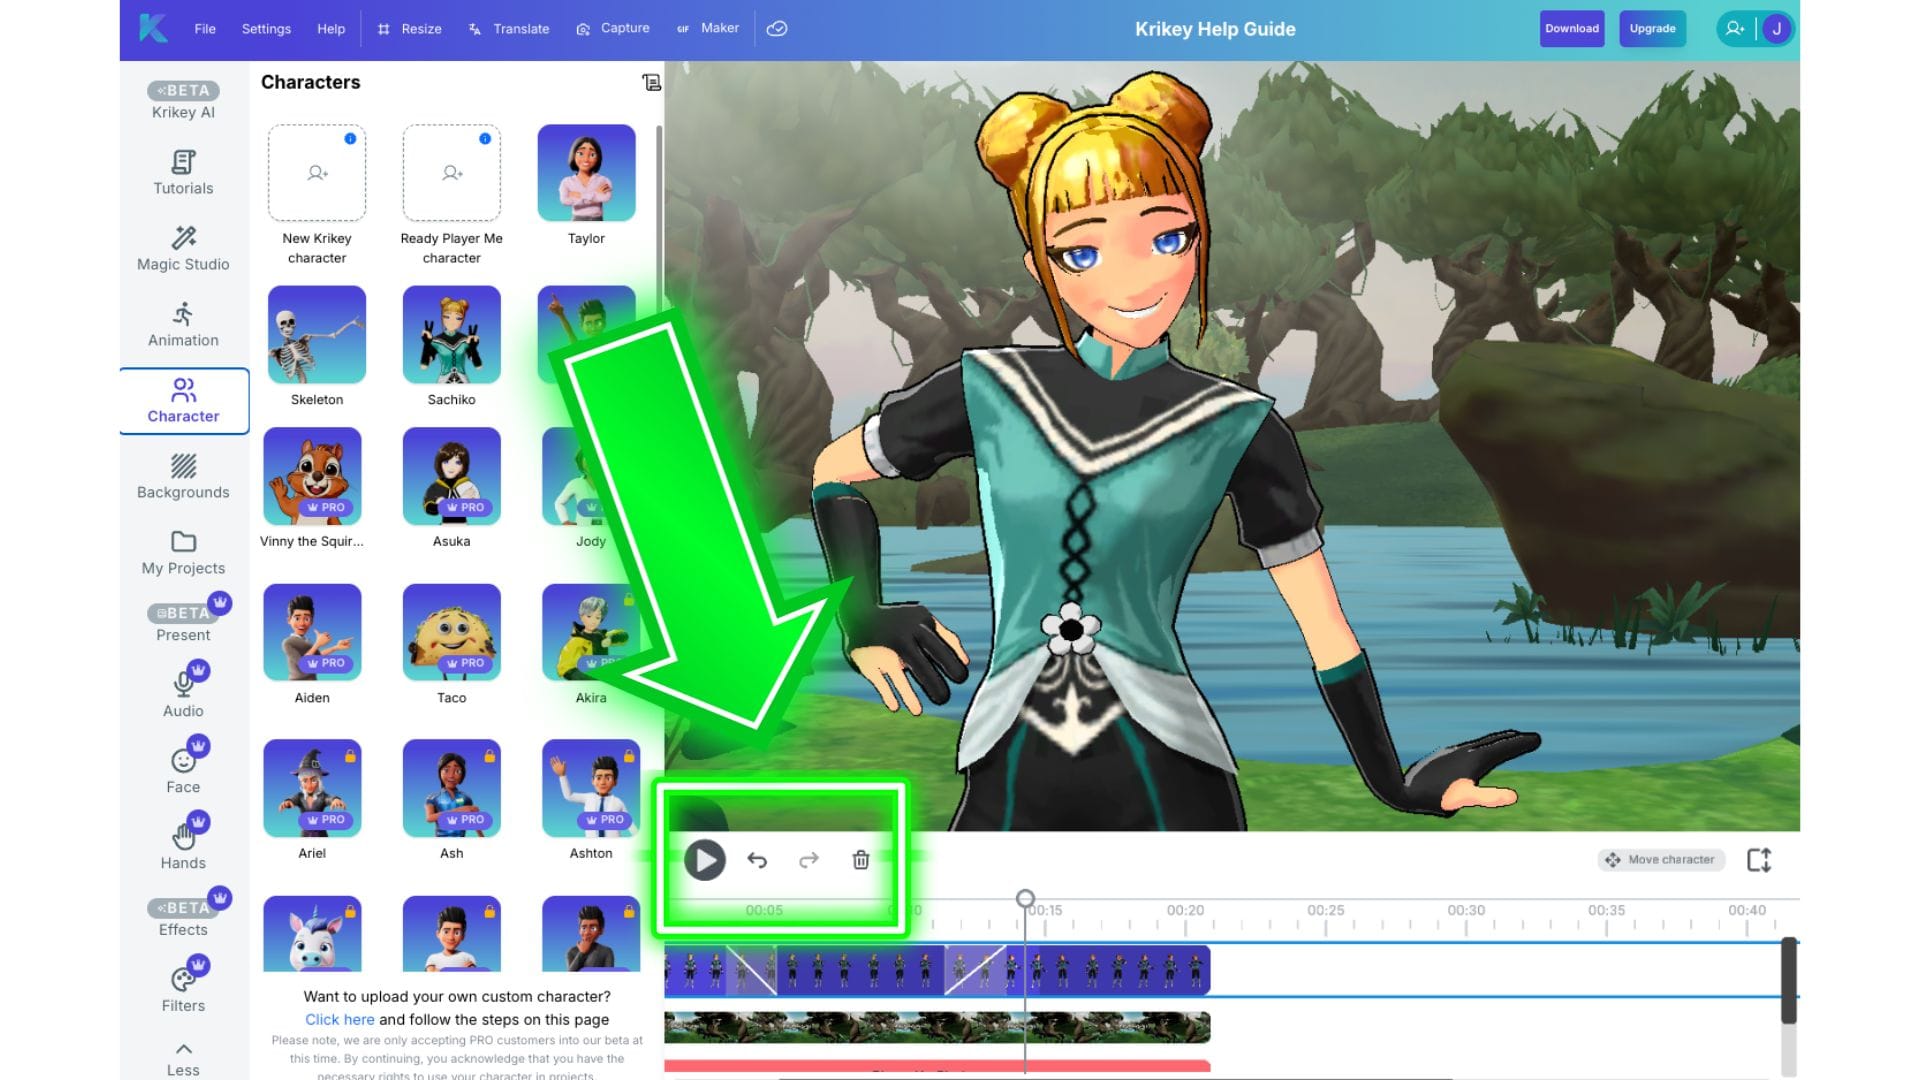
Character
To customize your character, click on the 'Character' icon in the left hand bar of icons.
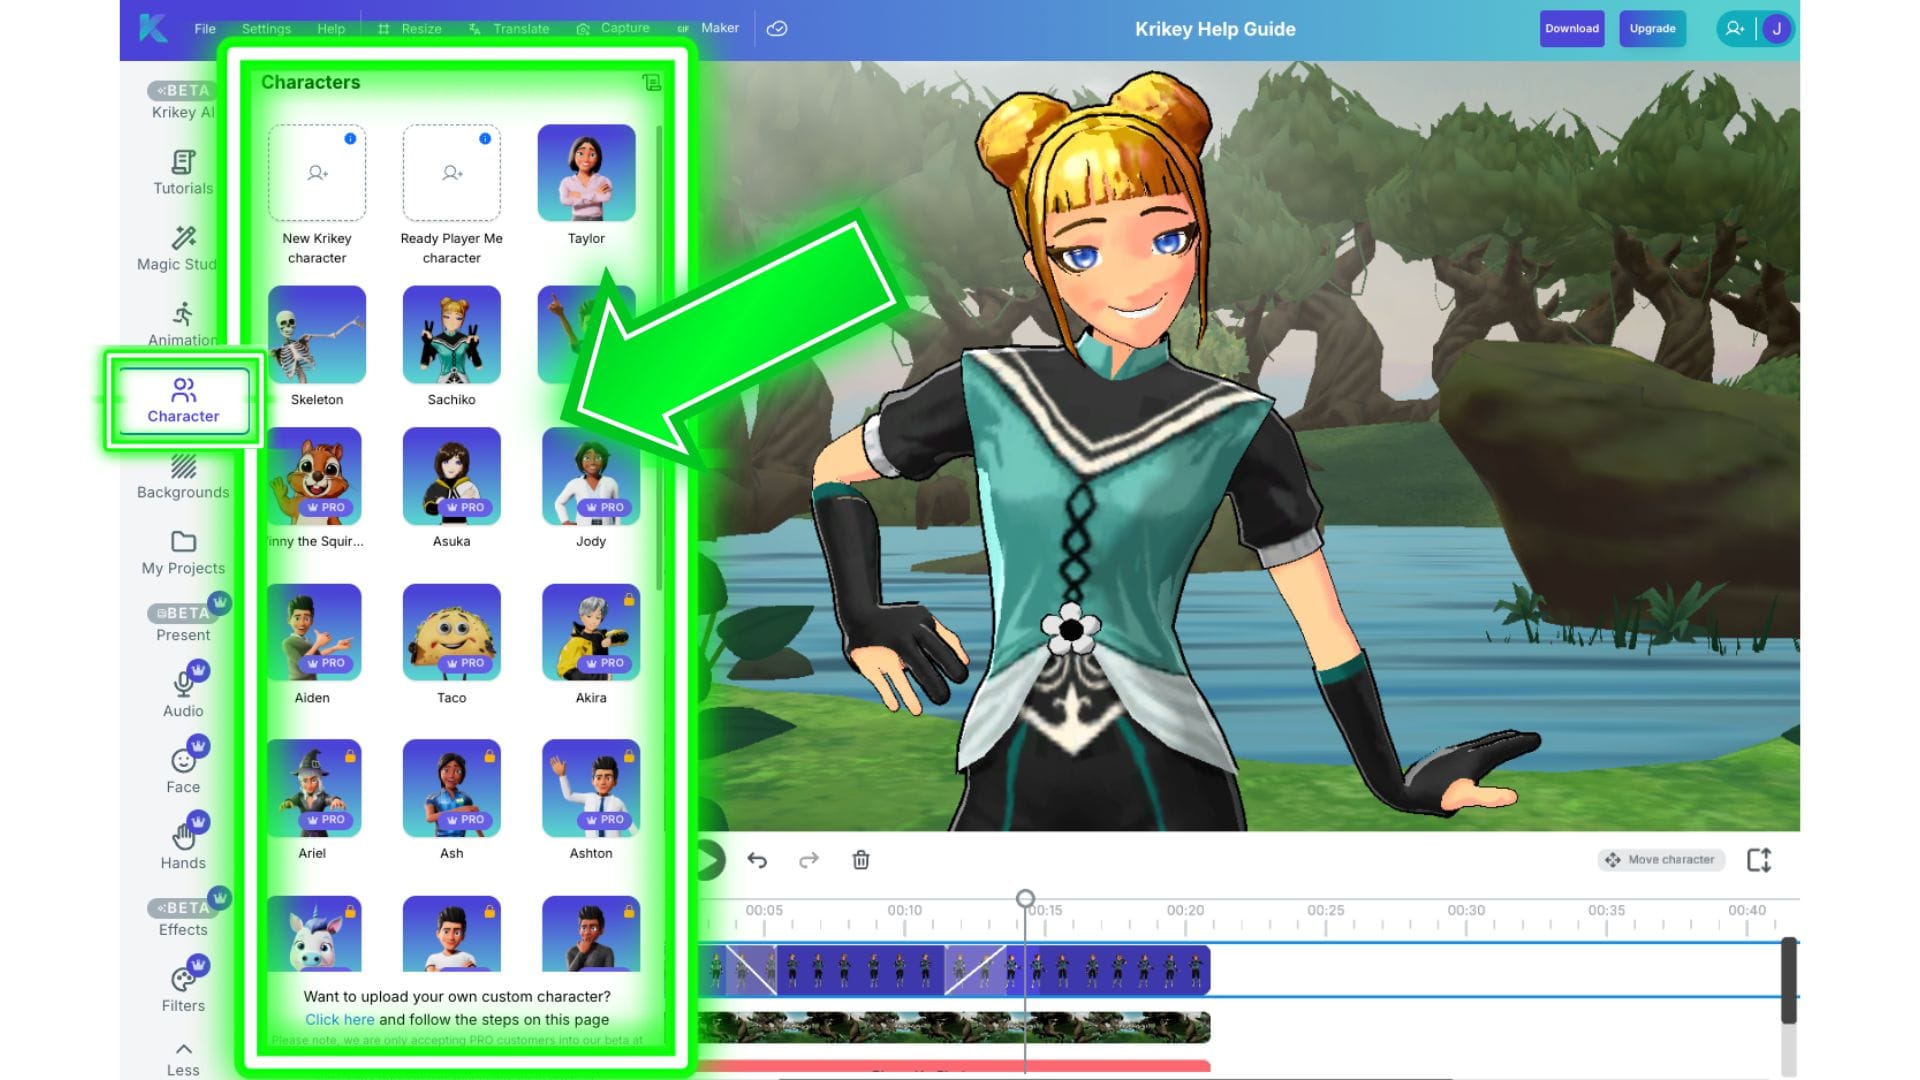
Krikey Character Library
The character library has several characters to choose from - you can browse and pick the one that best fits your project. From anime to tiger mascots, cute animated Unicorns, cartoon tacos, dancing skeletons, cartoon doctors, cartoon teachers and more - there's a character for every project!
- Click Character on the left side of the screen
- Select from any of the preset characters (e.g. Astra, Sachiko, Bobby)
- This character will automatically appear on your video - ready to go! It will lip sync immediately to your dialogue and has automated character rigging to work with your animations right away.
Multi-Character: Currently you can only have one character per video project. To accommodate multiple characters, you have three options -
- Place your characters on a green screen in the Krikey Video Editor and export them. Then connect them into the same scene using another video editor and keying out the green screen.
- Export transparent GIFs of each character from the Krikey Video Editor. Transparent GIFs have no background so you can then place characters next to each other in another design tool.
- Use the Krikey AI Canva App or Adobe Express Add-On to make your project directly inside one of these tools (you can access Krikey Animations in both Canva and Adobe).
AI Character Creation (Custom)
- Step 1: Click on "AI Character Creation."
- Step 2: Upload a photo of yourself, a friend, or a brand mascot.
- Step 3: Choose a style: Anime, Cartoon, K-pop or Mini Me.
- Step 4: Click Create. The AI will generate a 3D model. Note: This process can take up to 10 minutes depending on complexity.
Backgrounds
In this section we will explore how to customize video backgrounds. To access Backgrounds, Camera Angles and Lighting, click on the Backgrounds icon in the left hand bar of icons in the Krikey AI Video Editor.
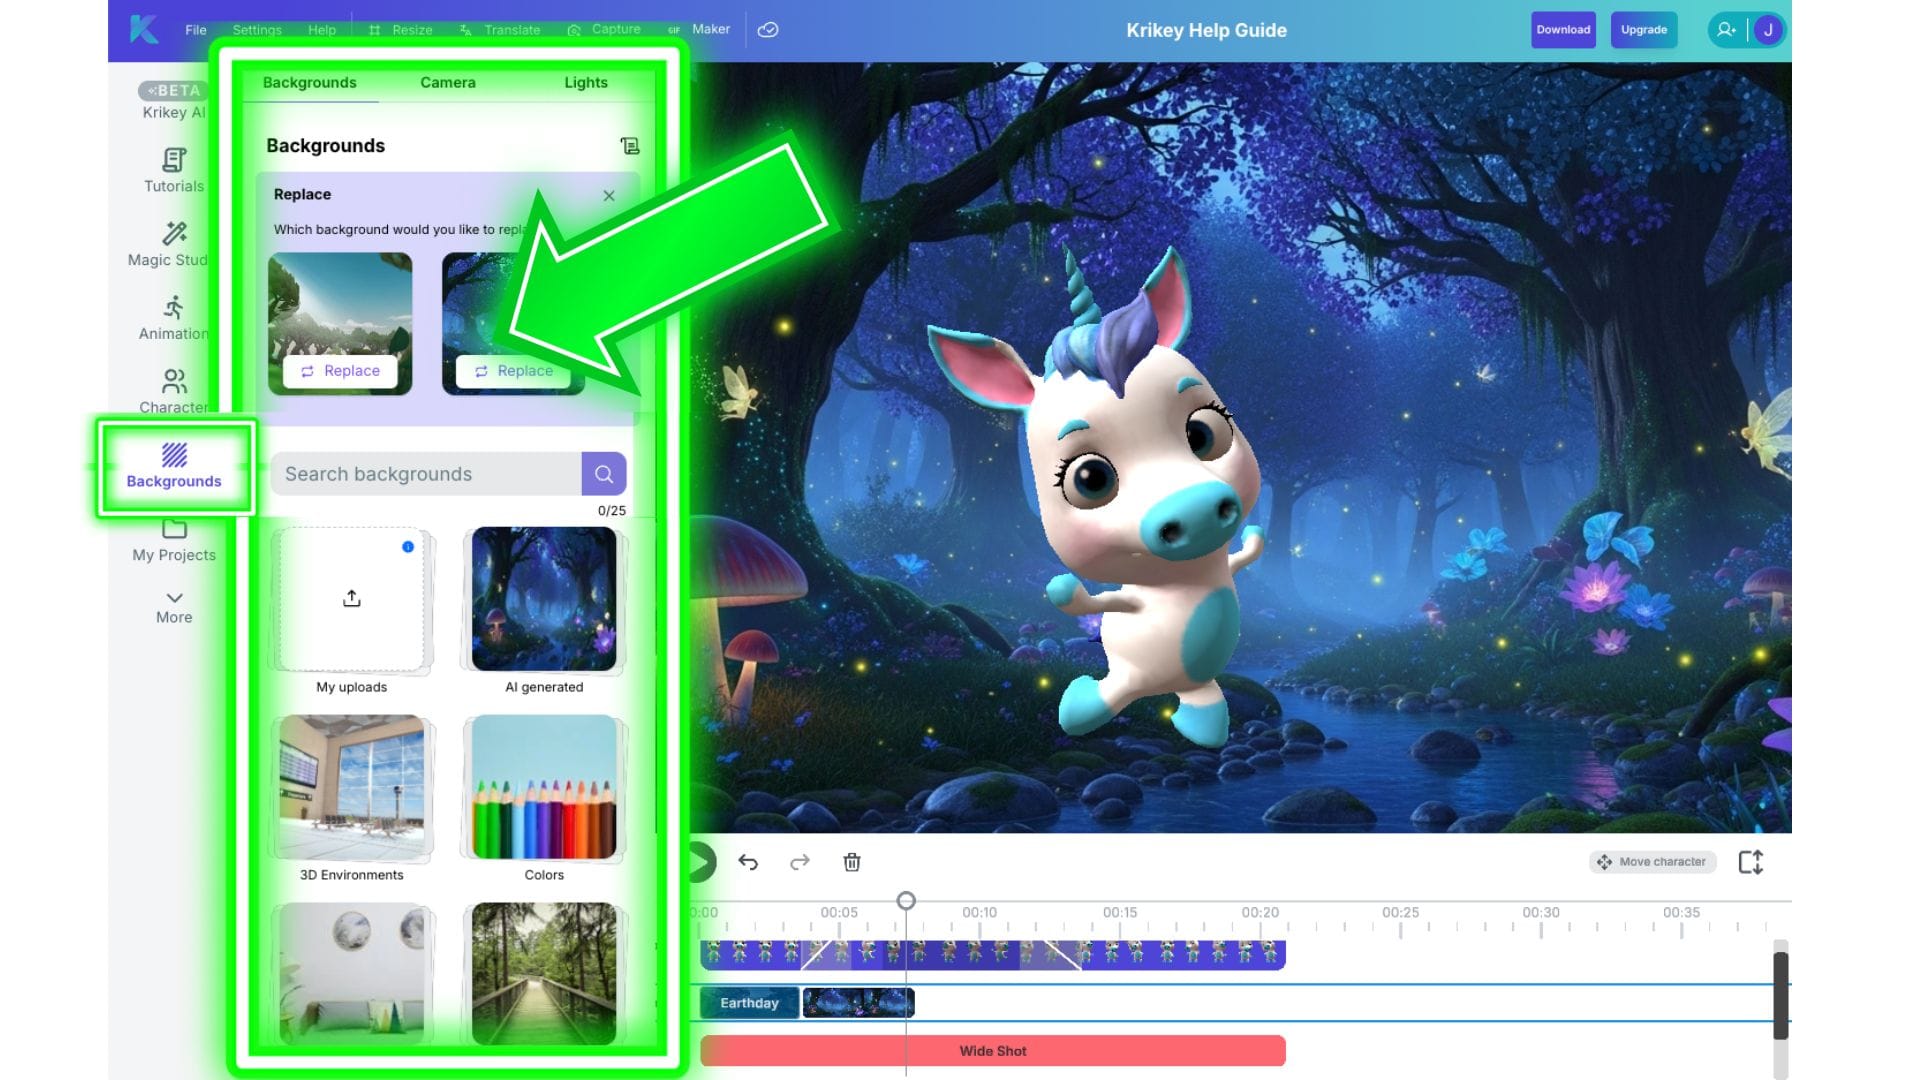
Backgrounds
Within the Backgrounds icon there are three tabs: Backgrounds, Camera and Lights. We will start with Backgrounds. In this tab you will see a Replace section at the top so you can choose which of your existing backgrounds you would like to replace.
Or you can skip this section and directly add a background - this means adding a new background to the end of your video timeline.
Under this section there is a search bar so you can search our collection of backgrounds to see the options available for your animated video - whether you are searching for a school building, coffee shop or office interior - we have lots of choices to set the scene.
Below the search bar are different boxes - here is what each of them does:
- My Uploads: Upload your own images to use in the background of your animated video on the Krikey Editor.
- AI Generated: Type in a text prompt and use our AI Image Generator to create a unique background for your animated video.
- 3D Environments: These environments rotate! They are made in a 3D format and great for moving your character around a scene - from an office to an airport to a grand palace and a rainbow swirl - there's lots of scenes to explore.
- Photography: The rest of the boxes contain real world photography background options.
Camera
Within the Backgrounds icon there is a tab for Camera Angles. Here you can edit your camera angles and transitions within the Krikey AI Video Editor.
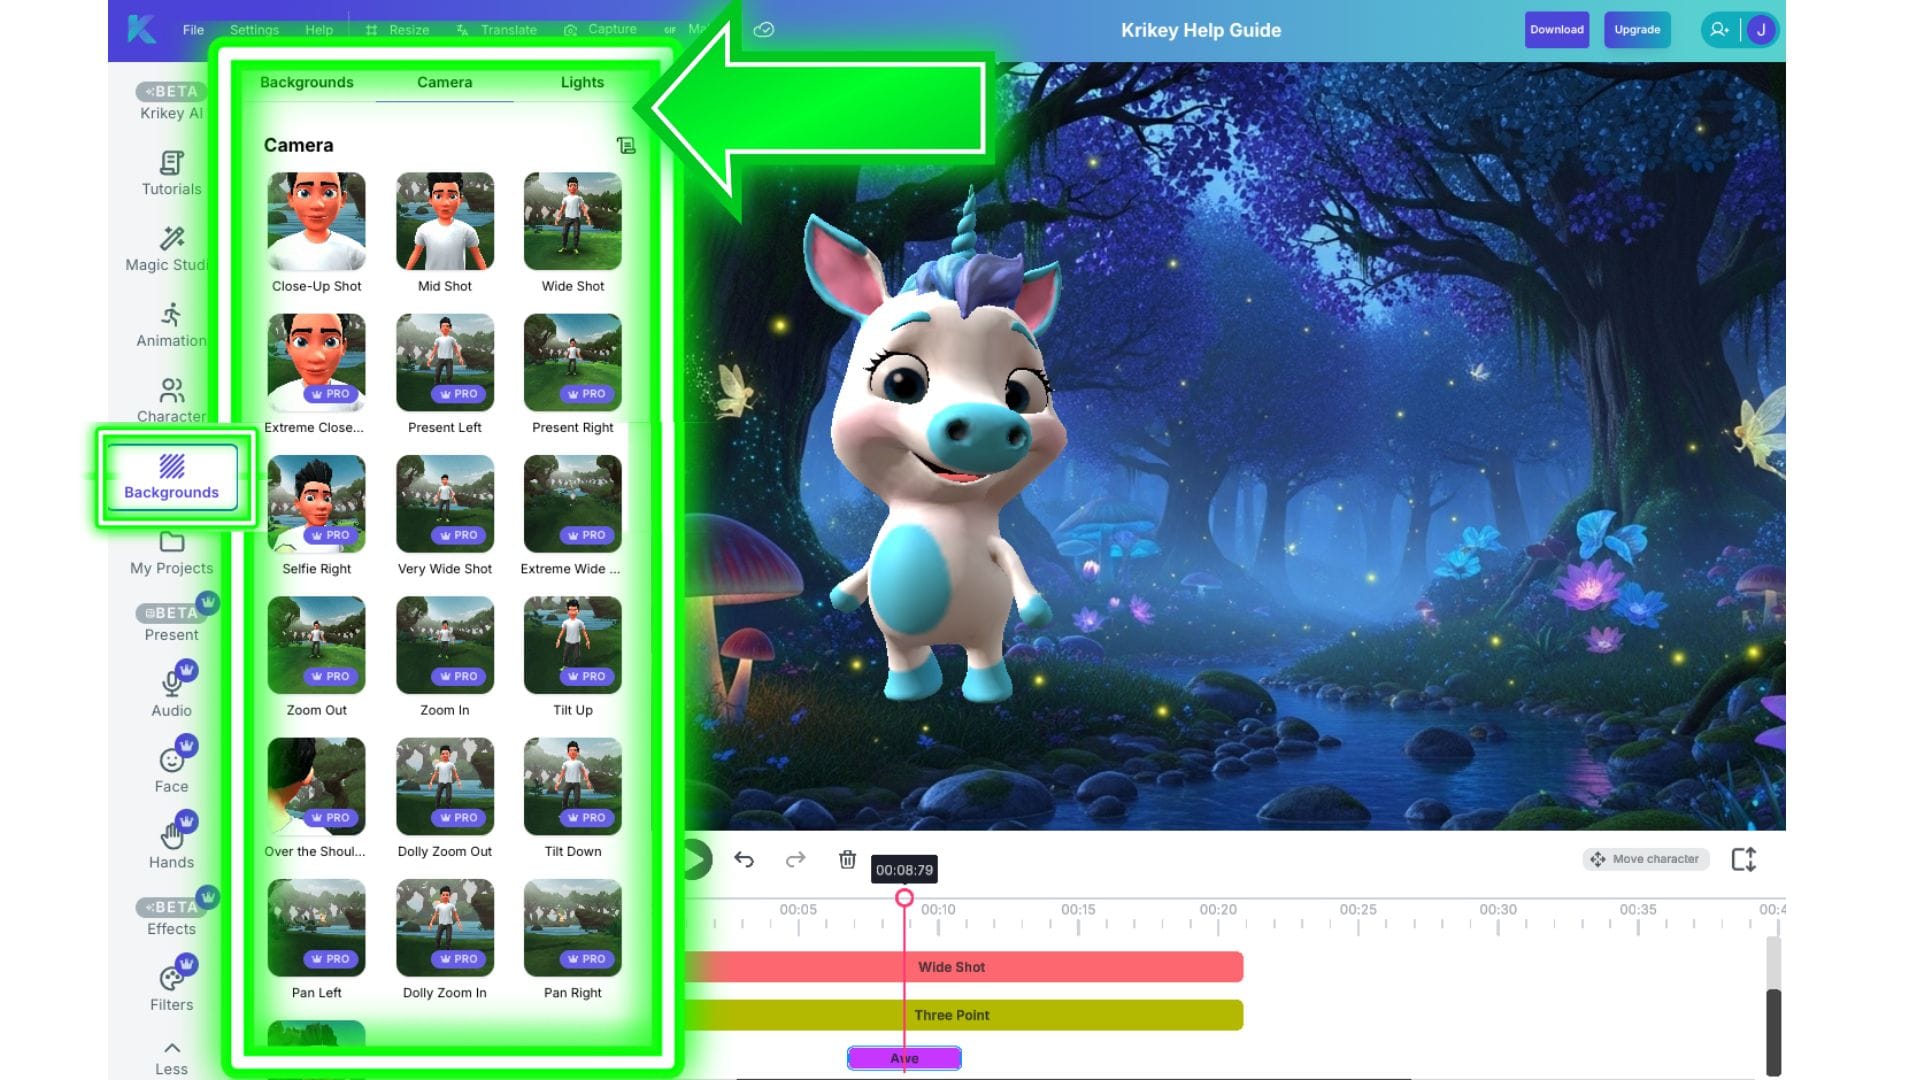
Within the camera angles tab you can choose from Close-up shots, Zoom shots, Dolly shots, Wide shots and more. This menu focuses on positioning just the camera as it faces the scene. There are separate controls for moving a character within a scene - we will describe those in another section of this guide.
When you select a camera angle, it will appear on your timeline in the bottom right section of the screen. You can see the order in which you have added camera angles. Overlap them slightly to get a diagonal line - this gives the camera a very smooth transition from one angle to the next.
You can also select the camera bar in the timeline (for example in the image displayed, this would be the red bar that says Wide Shot) and when you click on it, it will open a mini menu of options.
In the mini menu you will see that you can:
- Adjust the camera position to be Front, Back, Left or Right of where it is currently placed.
- Follow Character - this is especially useful if you have a walking animation where you want the camera to follow the character rather than letting the character walk offscreen as the animation plays.
- Rotate Left-Right: This allows you to move the camera (not the character) - and it is only available when you check the Follow Character box.
- Rotate Up-Down: This allows you to move the camera (not the character) - and it is only available when you check the Follow Character box.
- Slide Left-Right: Slightly adjust the camera angle on the character
- Slide Up-Down: Slightly adjust the camera angle on the character
- Camera Distance: Slightly adjust the camera angle on the character
- Zoom: Slightly adjust the camera angle on the character
These mini menu buttons are helpful for minor adjustments – if you need the character position to change significantly, then we recommend using the move character menu rather than camera angles.
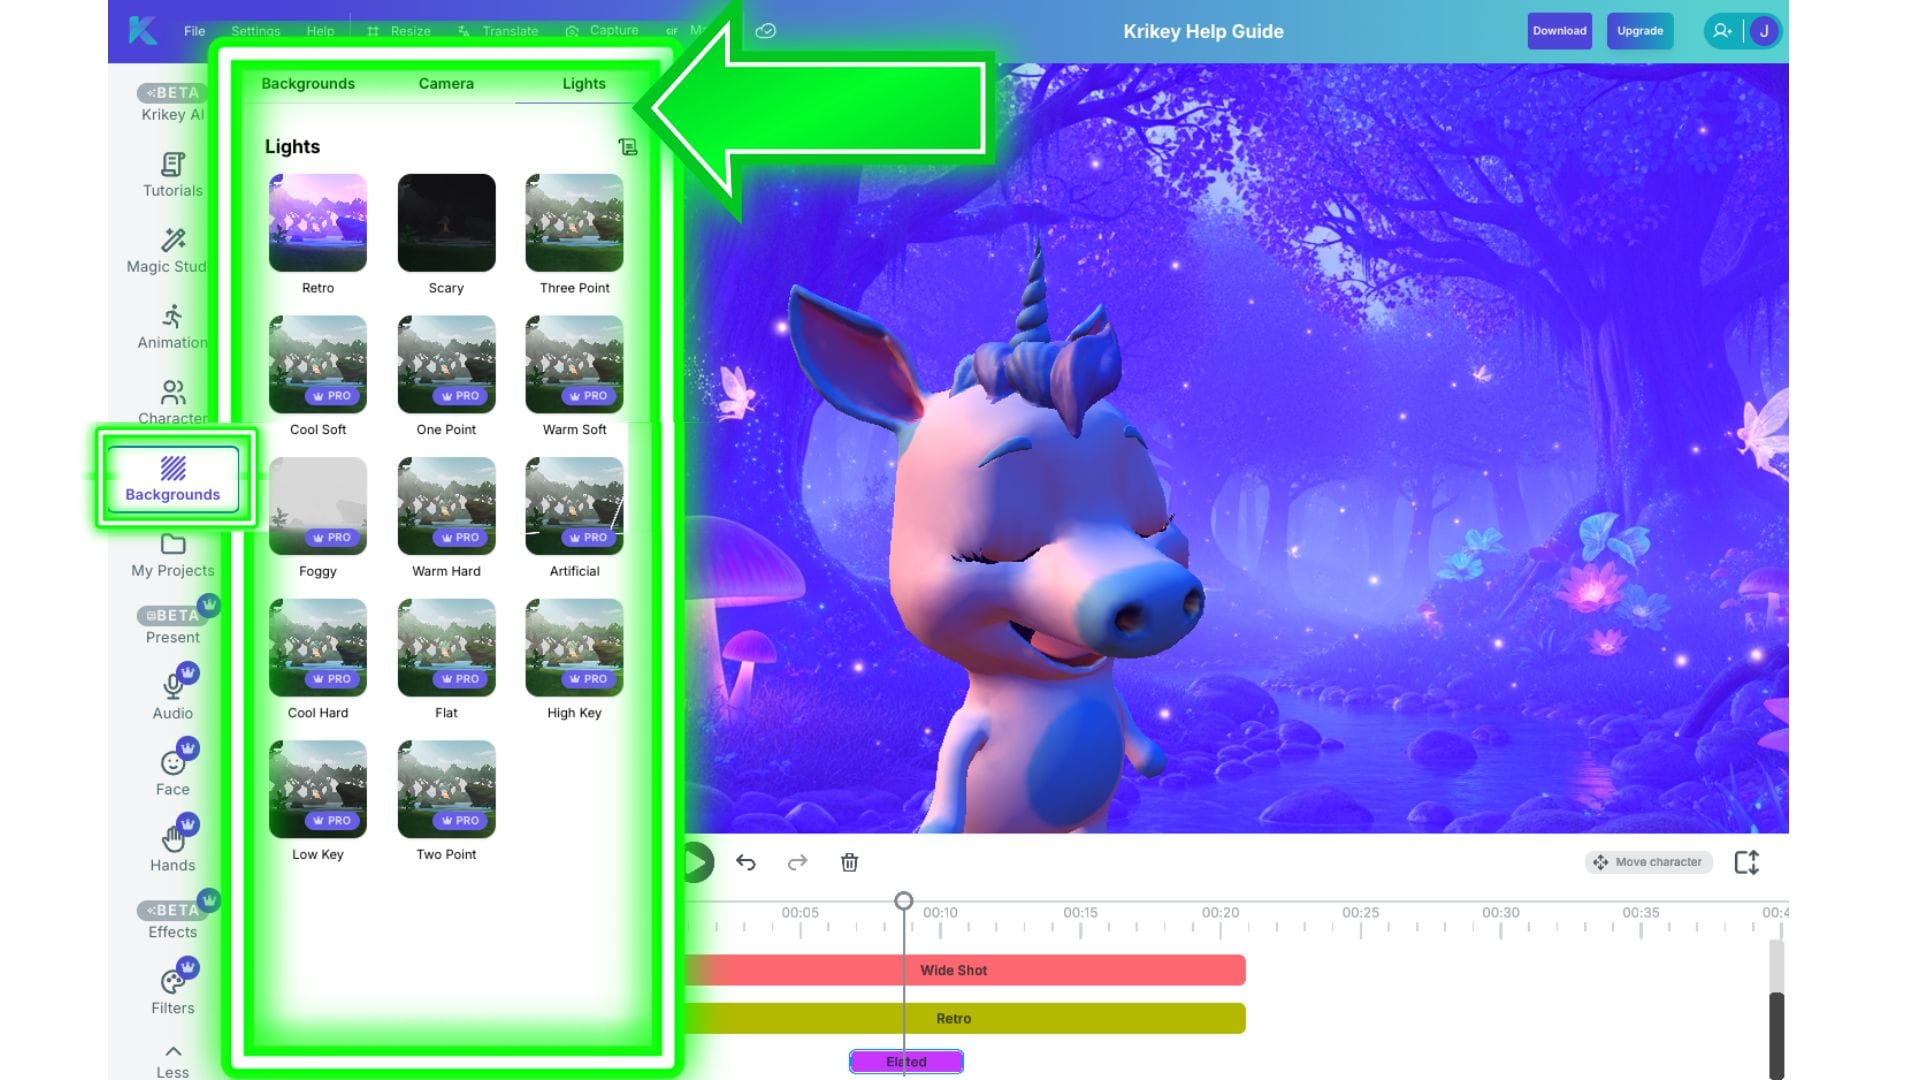
Lights
In this section you can explore different lighting for video options inside the Krikey Editor - from traditional three-point lighting to scary lights, foggy scenes, High Key and Low Key lighting options. Just click on a light to add it to the timeline.
Remember to check your timeline to make sure your video backgrounds, camera and light tracks are aligned. If you don't have lighting on a track where you have a character and background - it will appear dark. If you don't have camera on a track where you have a character - it will appear in bird's eye view. You need all three to be layered on top of each other in the Krikey Video Editor to see the scene properly on the right: Lights, Camera and Backgrounds.
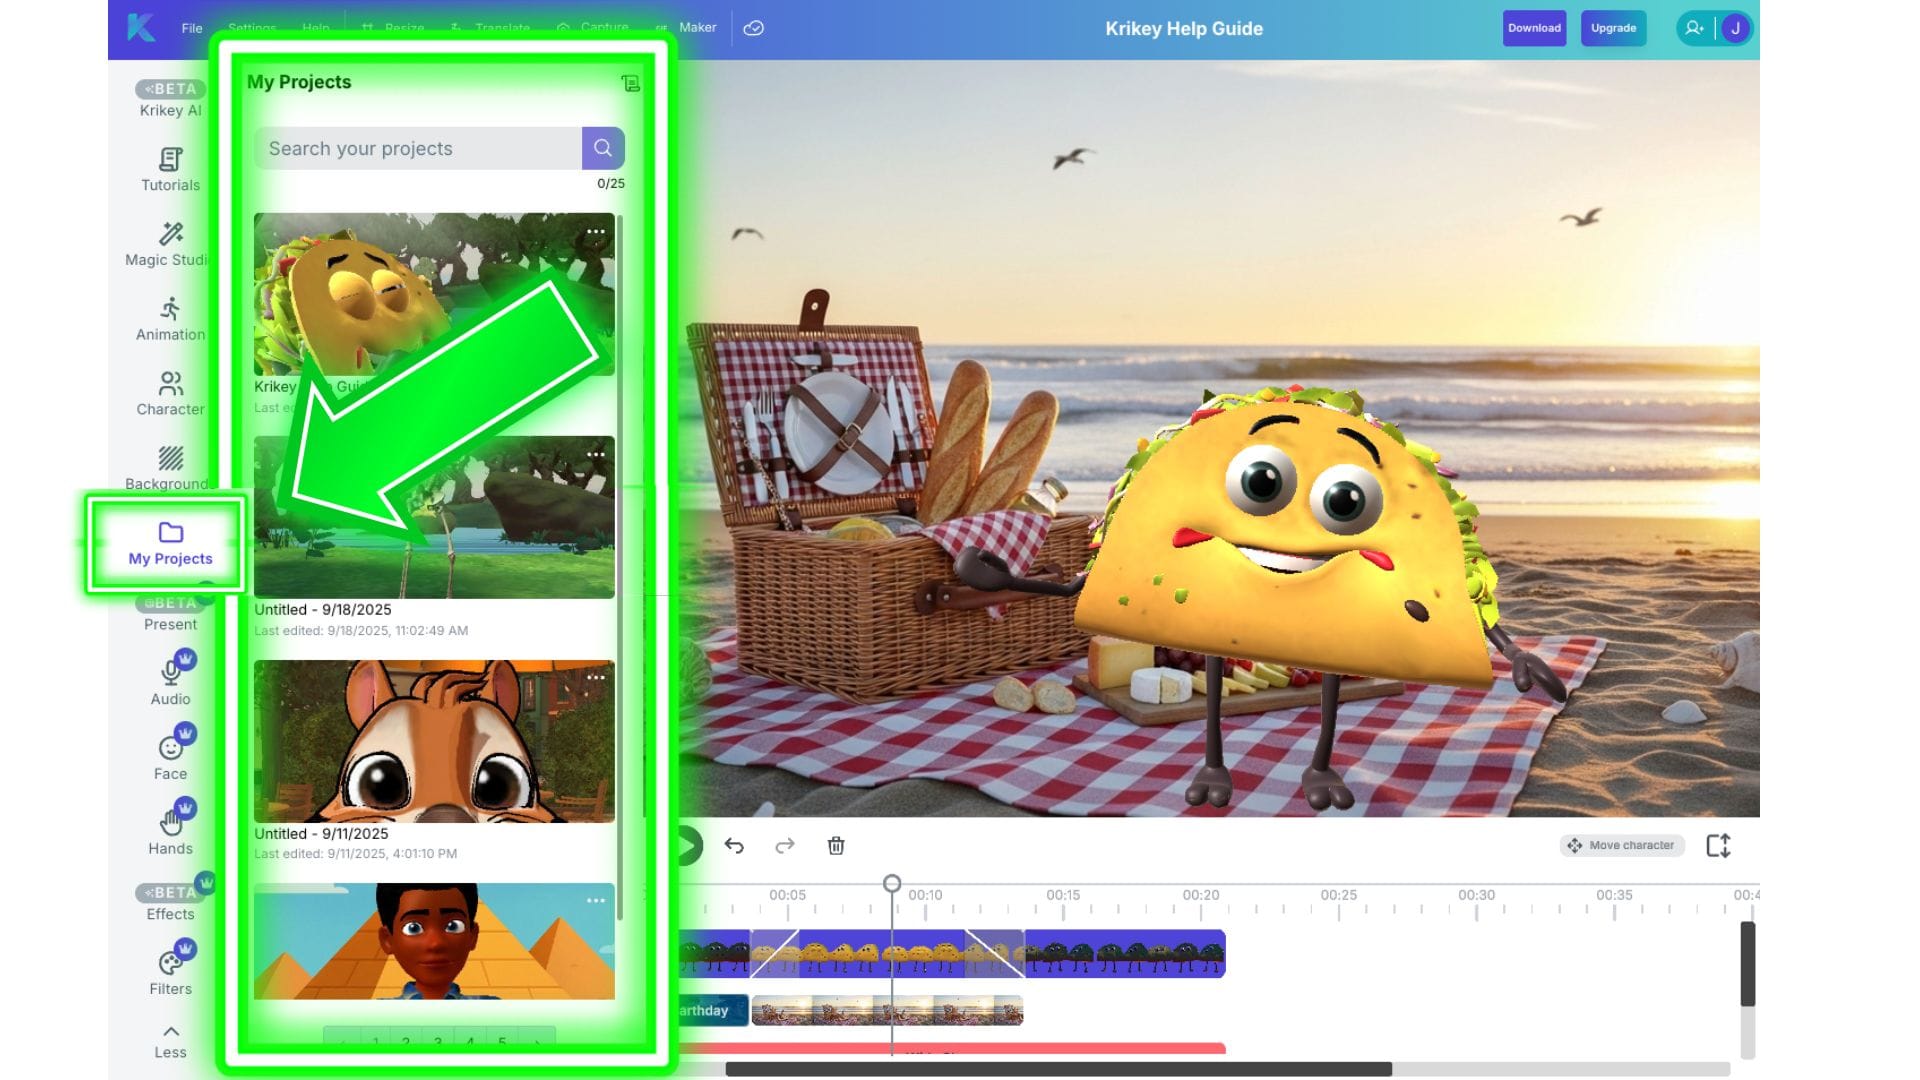
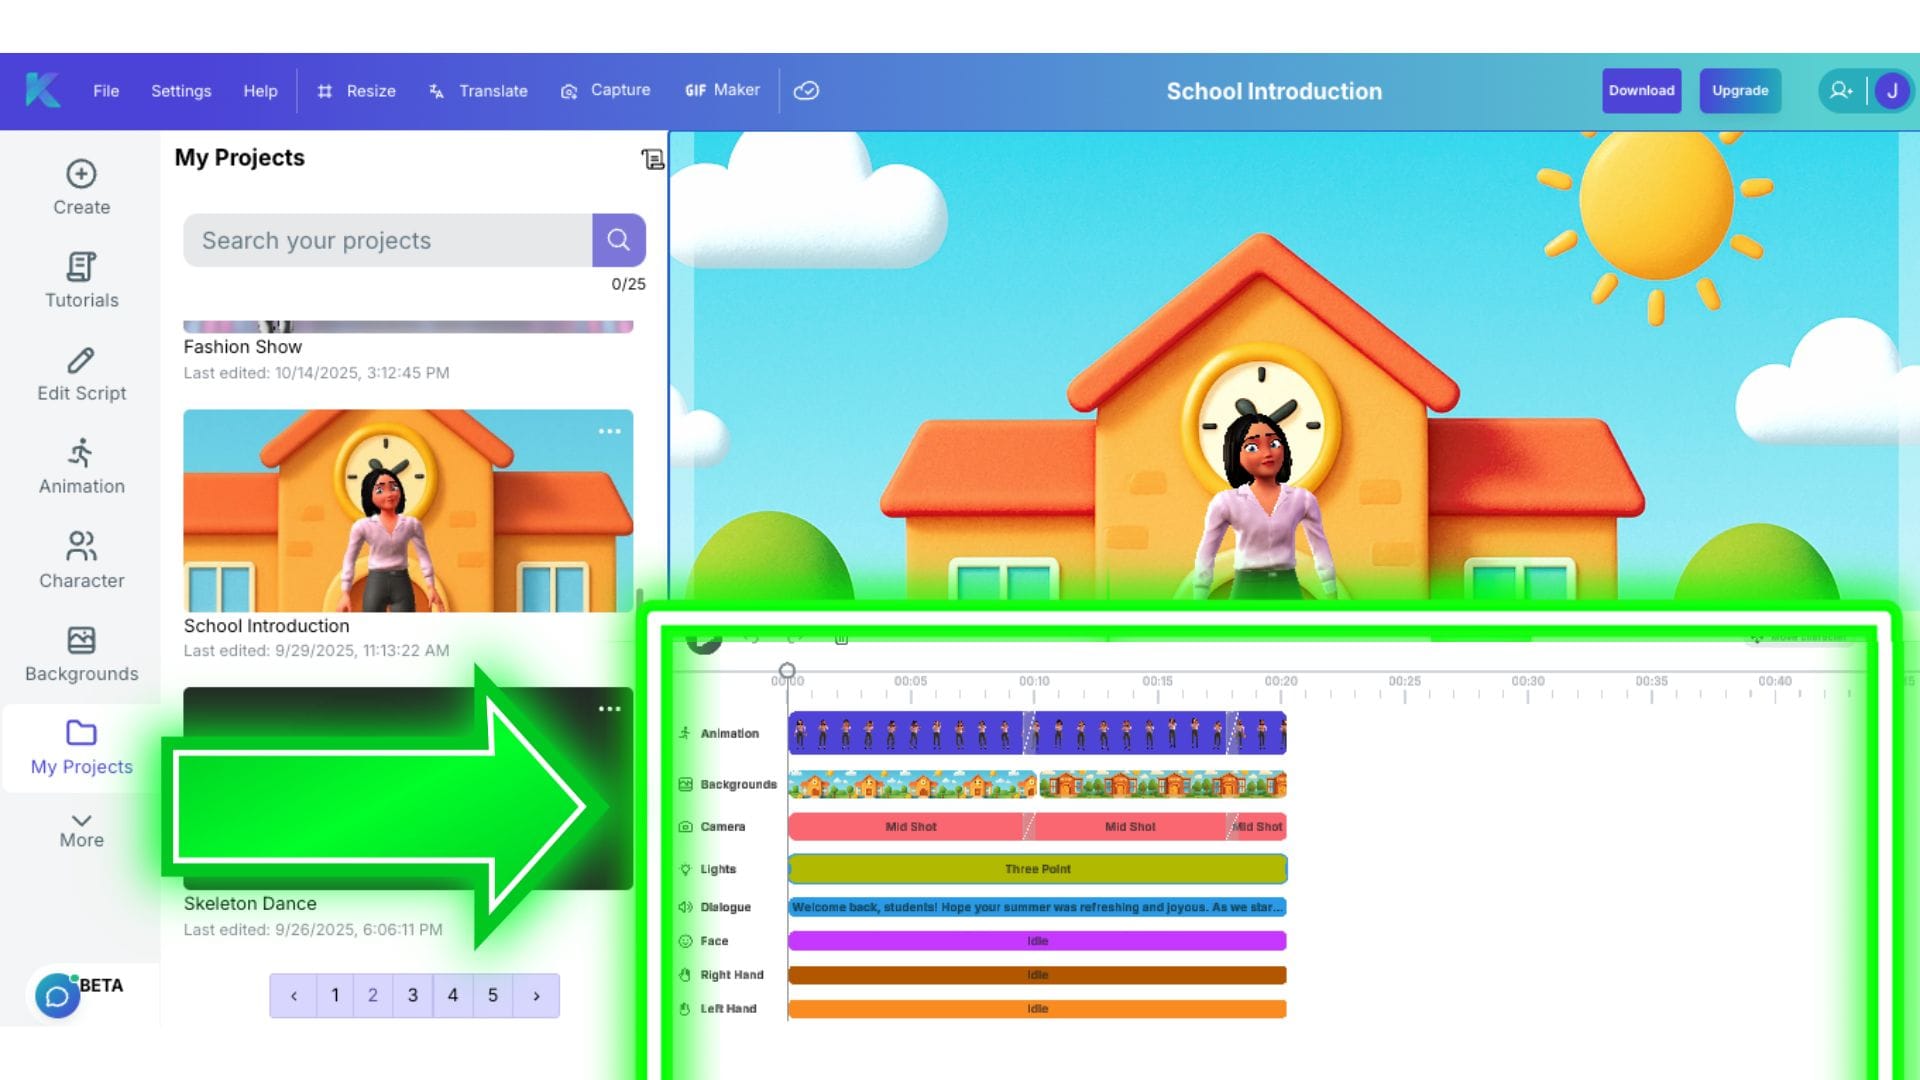
My Projects
In this section you will find past projects you have created using the all-in-one Krikey Animation toolkit. To access your projects, click on the My Projects icon in the left hand bar of icons in the Krikey AI Video Editor.
You can open these any time to edit them, export and resize them in different aspect ratios for other social media platforms or use cases, and even re-open them to quick translate a video into another languages. It's seamless and easy to go back to previous projects using this folder in the Krikey Video Editor.
Present
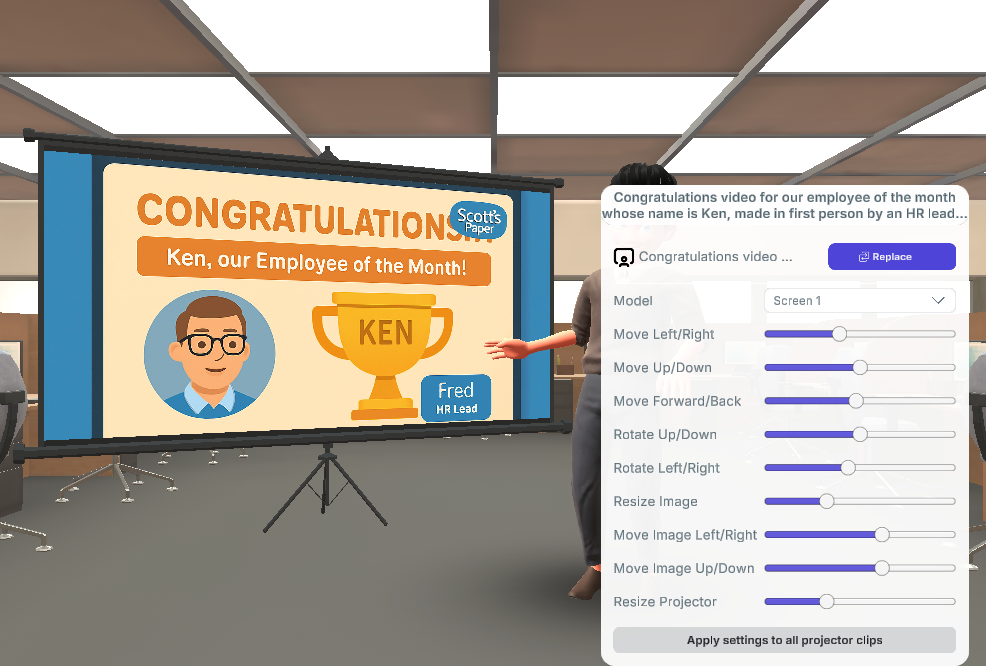
In this section you will learn how to add a presentation screen to the scene next to or behind your character. To access this feature, click on the Present icon in the left hand bar of icons in the Krikey AI Video Editor. You can place images or videos inside the presentation screen and have your character talk and explain what is being presented.

Within this presentation screen icon, there are three tabs:
- Gallery: The Gallery tab has a gallery of photography to choose from.
- Upload: You can upload your own images or videos to place in the presentation screen.
- Generate: You can also use our AI image generator to generate images to put in the presentation screen.
When you click on the presentation bar in the timeline editor (bottom right white box) - then you will get a mini menu to further adjust your presentation screen. In this mini menu you can:
- Model: In this menu you can choose different frame sizes for the projector - from mobile to laptop to projector with a stand to frameless TV. This helps you choose the frame in which your image or video is presented in the scene.
- Move: There are slider bars to move the presentation projector screen up, down, forward, back, left or right. There are also separate Move slider bars to do this for the image within the projector screen. You can control these two items separately!
- Rotate: Rotate slider bars will rotate the entire projector screen up, down, left or right.
- Resize Image: This slider bar will resize the image within the projector screen.
- Resize Projector: This slider bar will resize the projector in the scene.
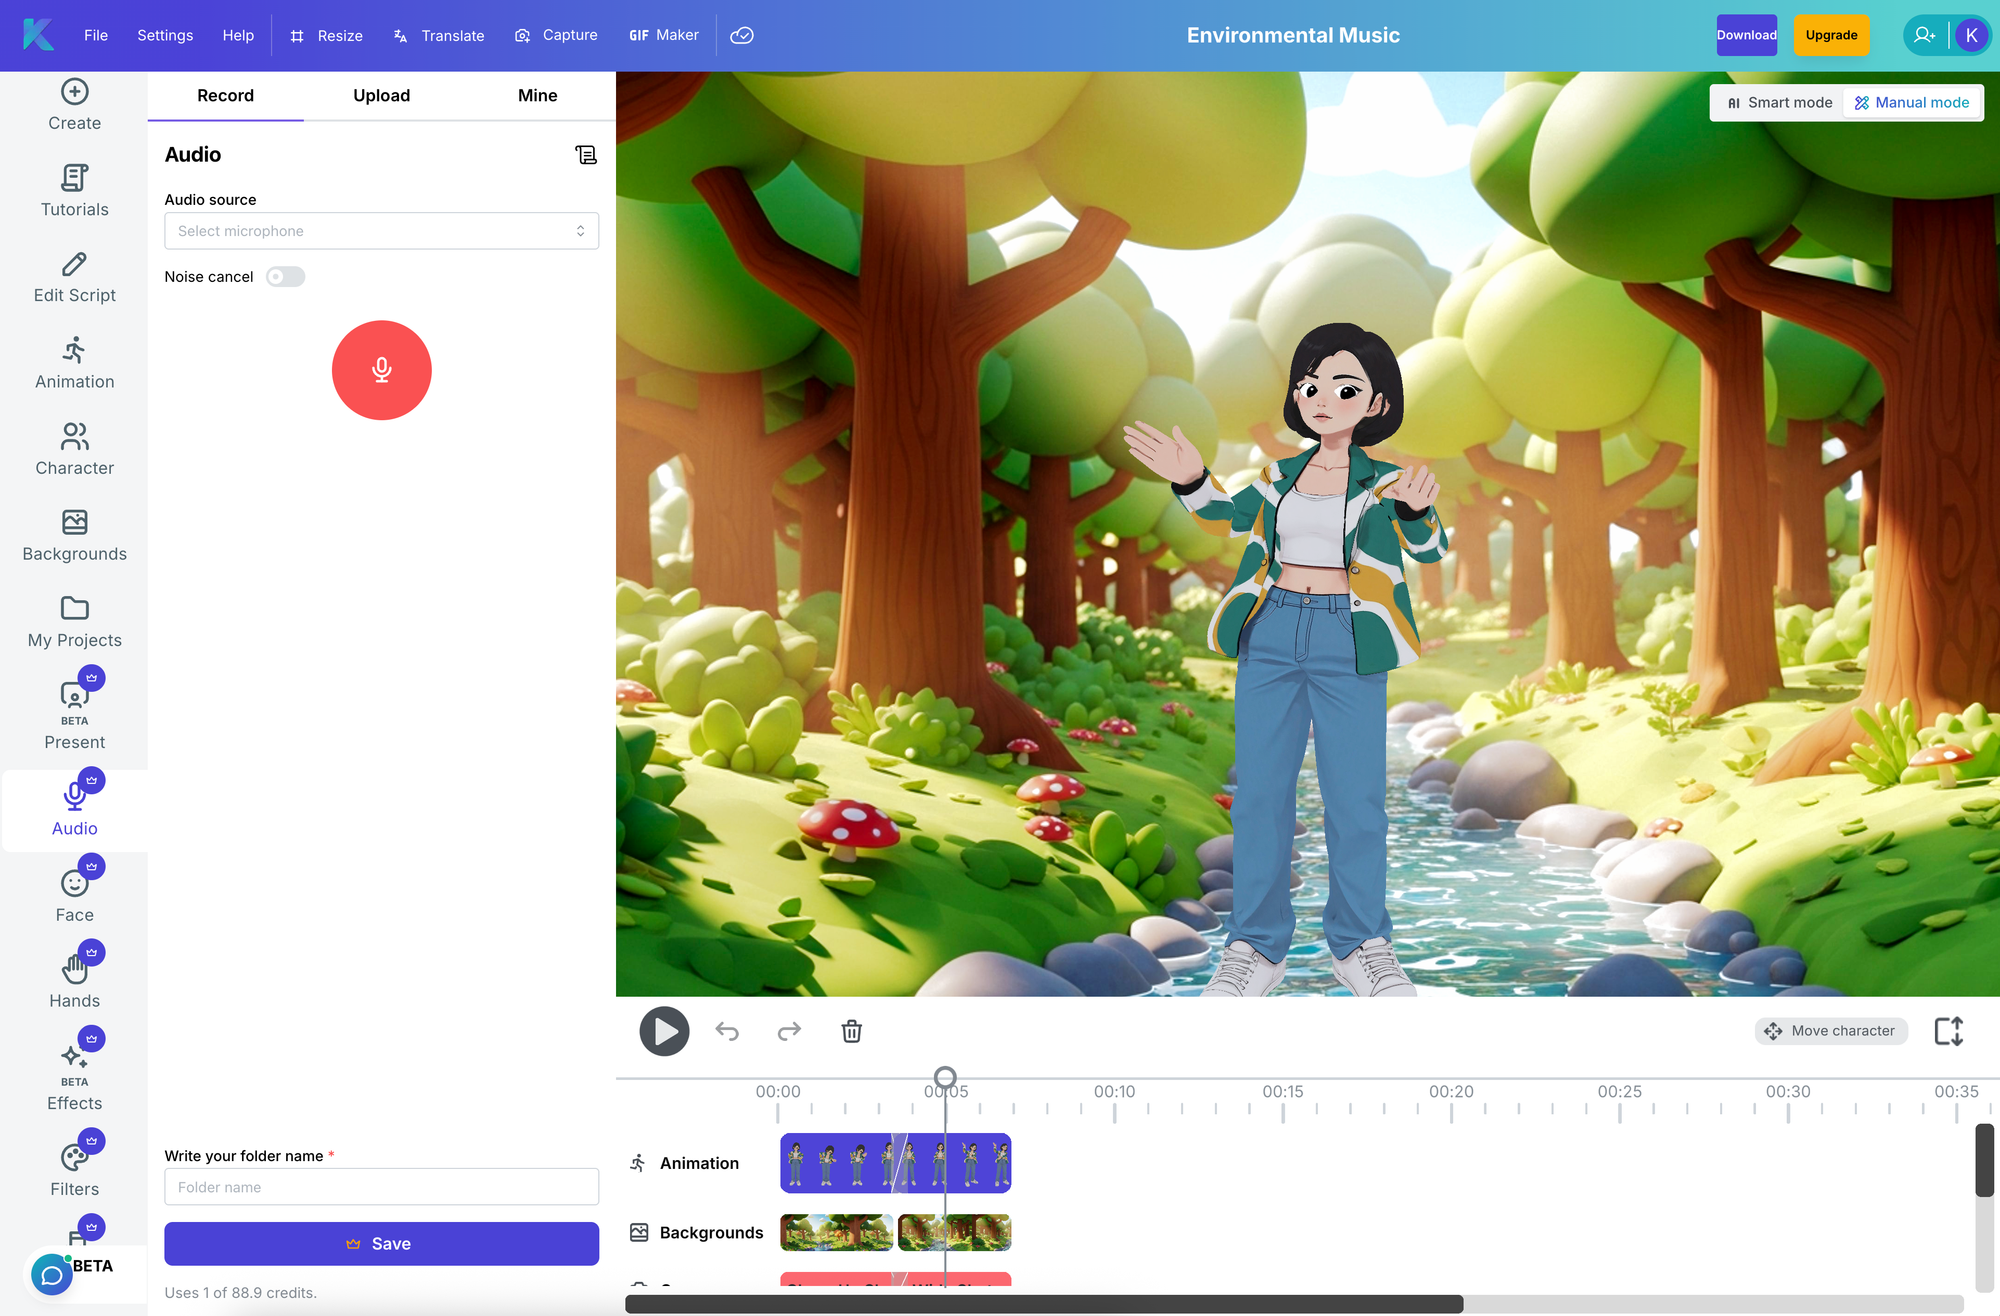
Audio
In this section we will explore the tabs inside the Audio icon. To write or edit your script and generate new AI Text to Speech voice AI dialogue, please go to the Magic Studio section of this help guide. The Audio section covers uploading recorded audio and accessing previously generated voice AI files.
To access these Audio features, click on the Audio icon in the left hand bar of icons in the Krikey AI Video Editor.

There are three sections inside the audio icon:
- Mine: This tab has all previously generated Voice AI audio files.
- Upload: This tab has all previously uploaded audio files.
- Record: This tab allows you to record your own voice
Recording Audio
To record audio, please follow the steps below:
- Enter Manual Mode after logging into the Krikey AI Animation editor. You can switch to manual mode using the toggle on the top right hand side of the screen.
- Navigate to the audio menu on the left bar
- Click the “Record” tab
- Make sure your microphone is selected. You can switch microphones by clicking on the audio source dropdown in the record tab.
- Record a test clip. You can start and stop recording by using the big red record button.
- Play back your test clip. You can delete the test clip by using the trash icon.
- You can record up to 60 seconds of audio for 1 project in the editor.
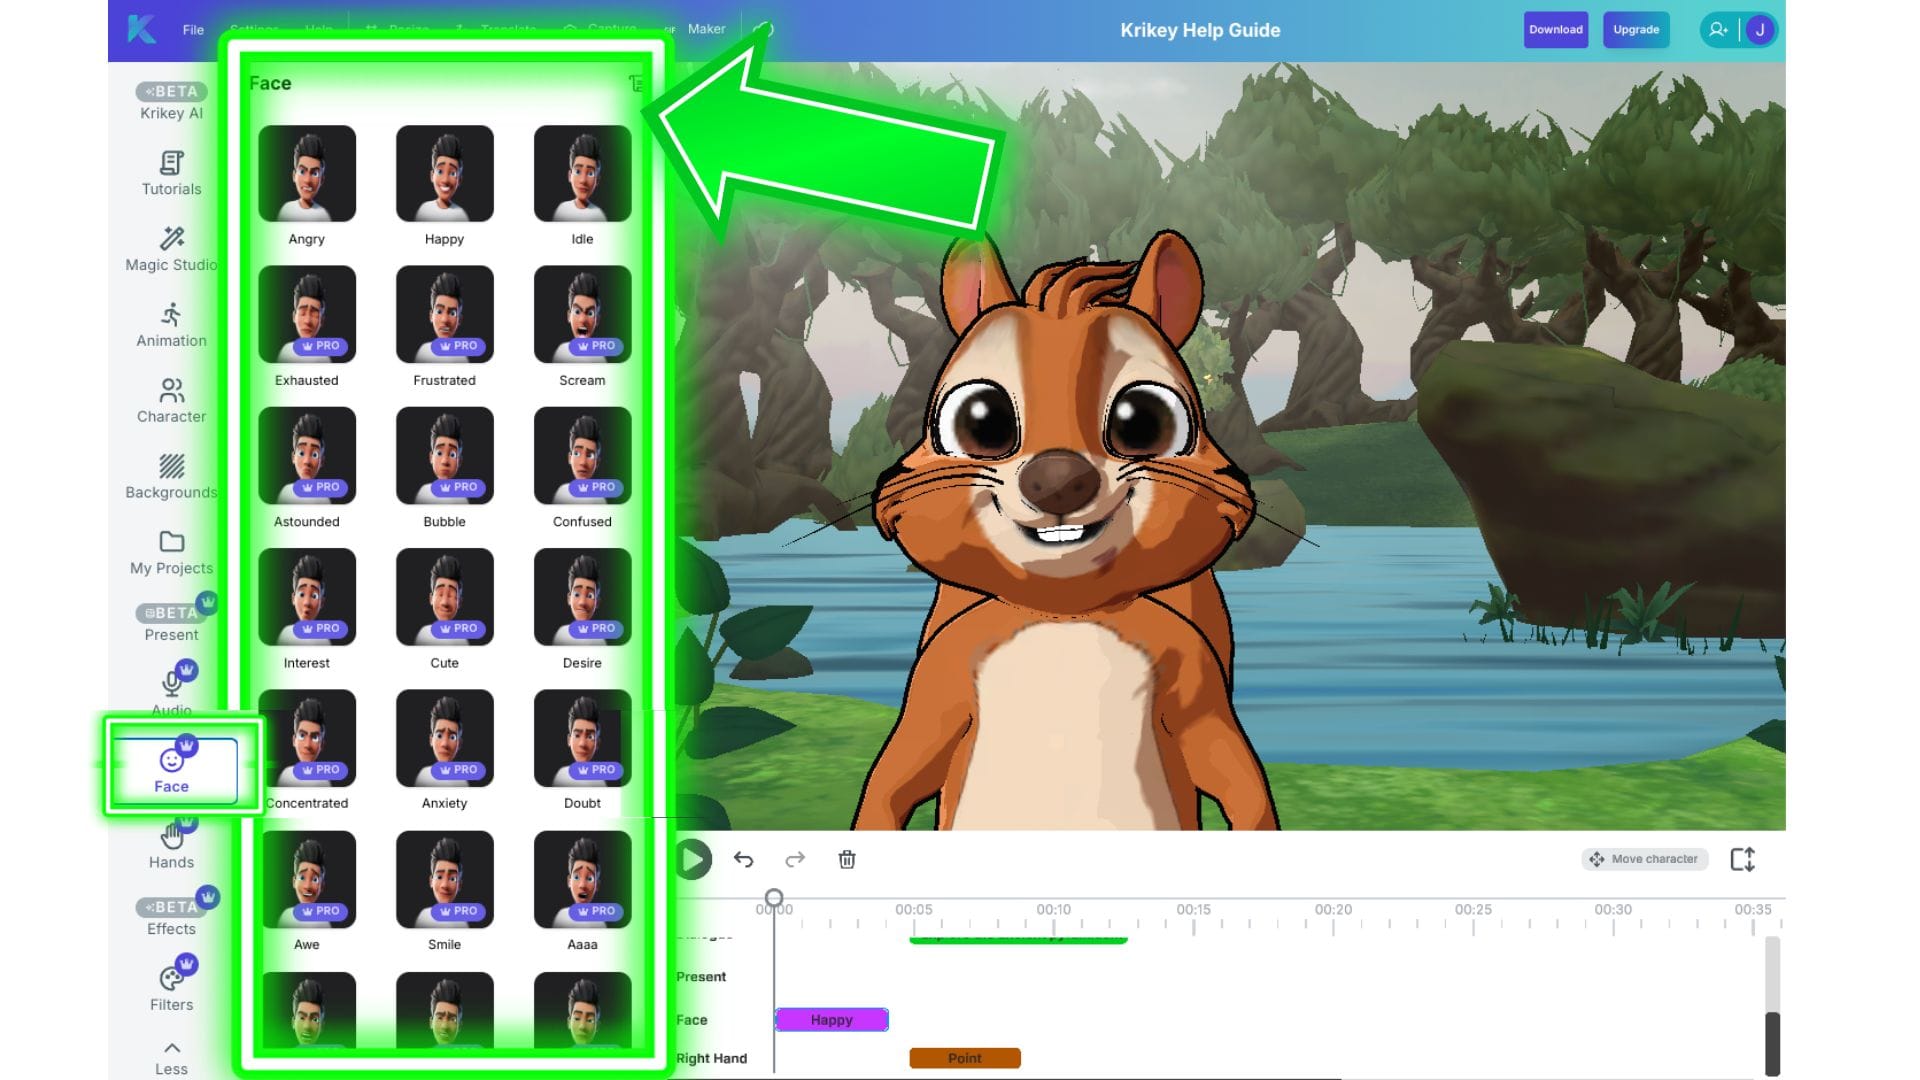
Face
In the face icon you will see a facial expressions chart with different expressions you can choose from. This allows you to add emotion to your character's face as they are speaking. From happy facial expressions to shocked, angry, scared, sad, smiling and more - you can bring emotion to your animation project with different facial expressions. To access the facial expressions chart, click on the Face icon in the left hand bar of the Krikey AI Video Editor.
Remember to overlap facial expression clips on the timeline editor (when you see the diagonal line between clips you will know they have been overlapped). This helps to ensure a smooth transition from one facial expression to the next.
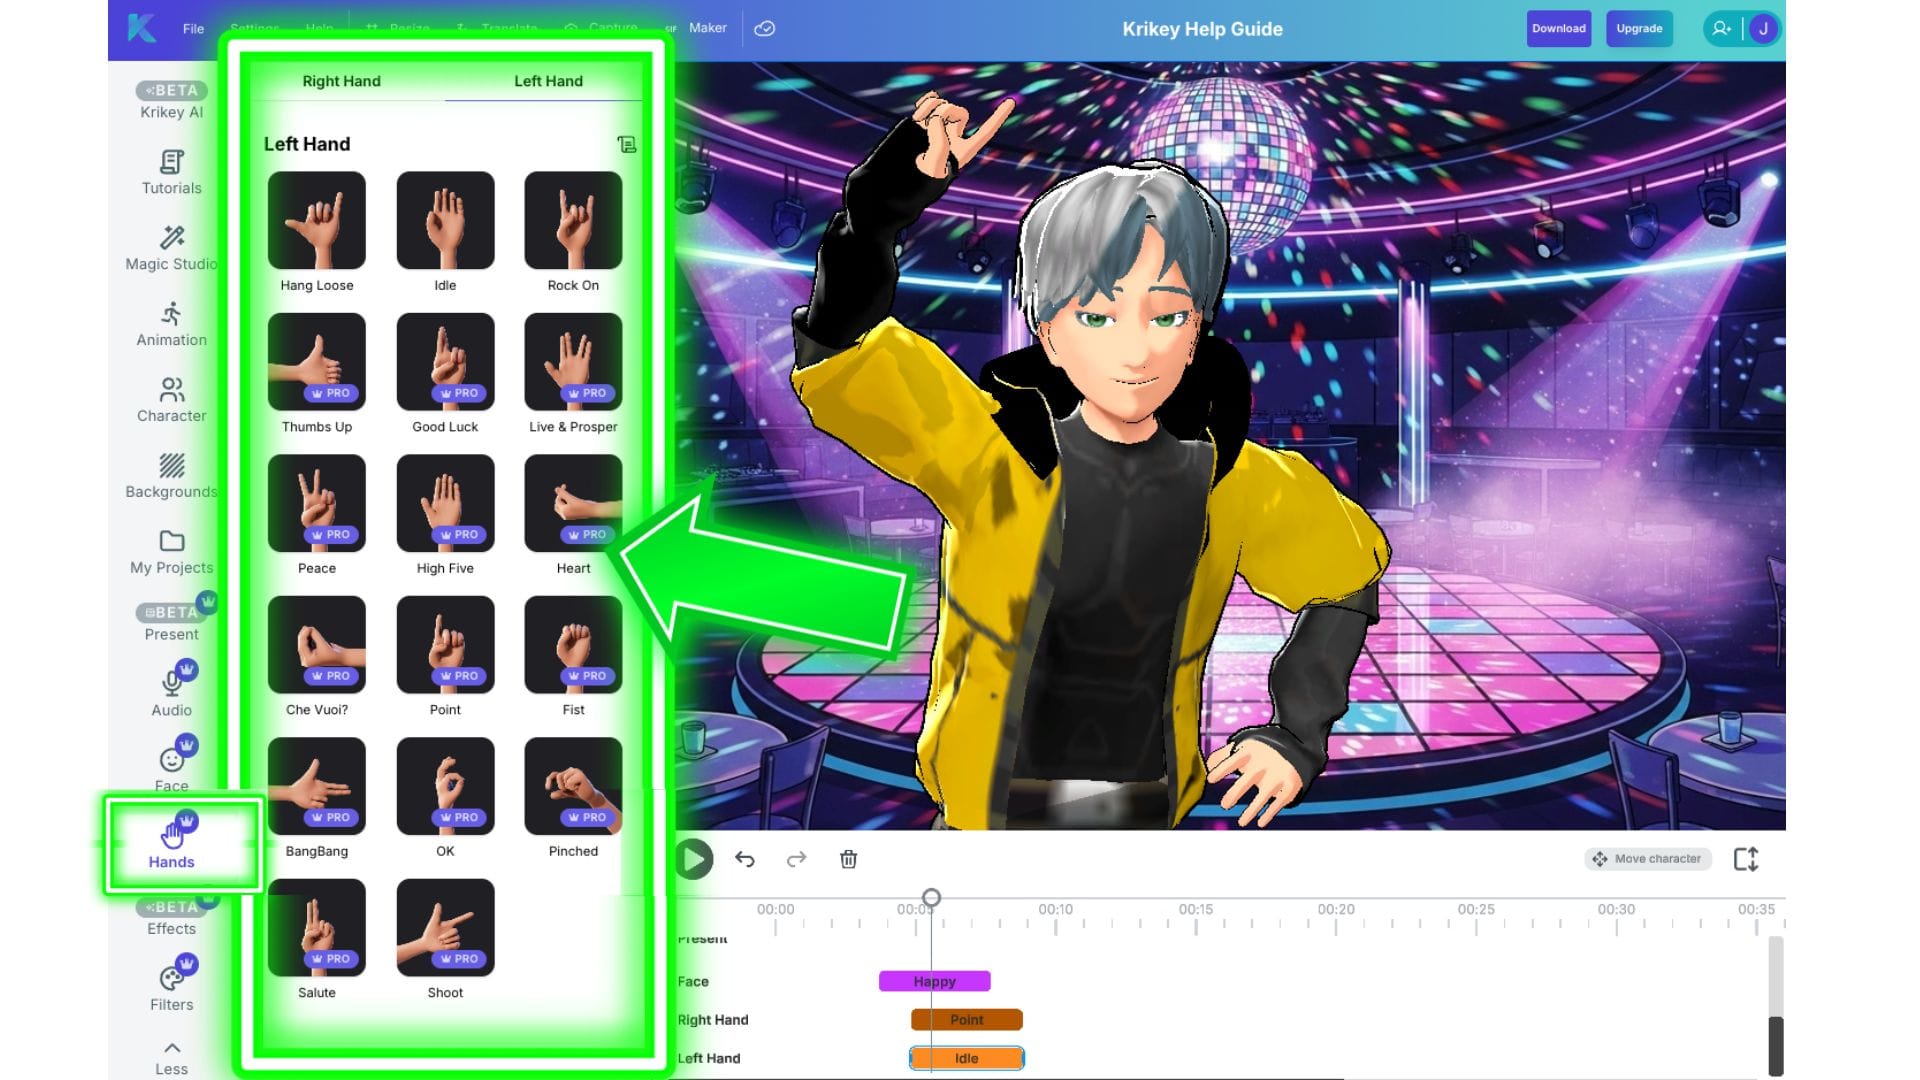
Hands
In the hands section you will find a variety of cartoon hand gestures to choose from. Whether you need a peace sign, hang loose or need to point to something on screen in your animated video, your cartoon character can handle it all. To access the cartoon hands menu, click on the Hands icon in the left hand bar of icons in the Krikey AI Video Editor.
There are two tabs inside the Hands icon:
- Right Hand: In this tab you will find a library of cartoon hand gestures that can be applied to the Right Hand.
- Left Hand: In this tab you will find a library of cartoon hand gestures that can be applied to the Left Hand.
Once you add a hand gesture to the timeline, you can drag it to appear at the exact moment you want the gesture to happen in the video. You can do this either by using the time stamp as a guide (for example, you can drag it to the 5 second marker) or you can align the hand gesture with another clip (for example a specific animation or dialogue).
To transition cartoon hand gestures smoothly, be sure to overlap the hand gesture clips till you see a diagonal line. This means the hand gestures will smoothly transition from one to the next, giving the cartoon hands a realistic feel.
If you are looking for sign language hand gestures, please go to the Animations icon and search for the Sign Language animation pack. You can combine the animations and hand gestures to create specific signs for your video. If you have any requests for additional sign language words and phrases, please email our support team!
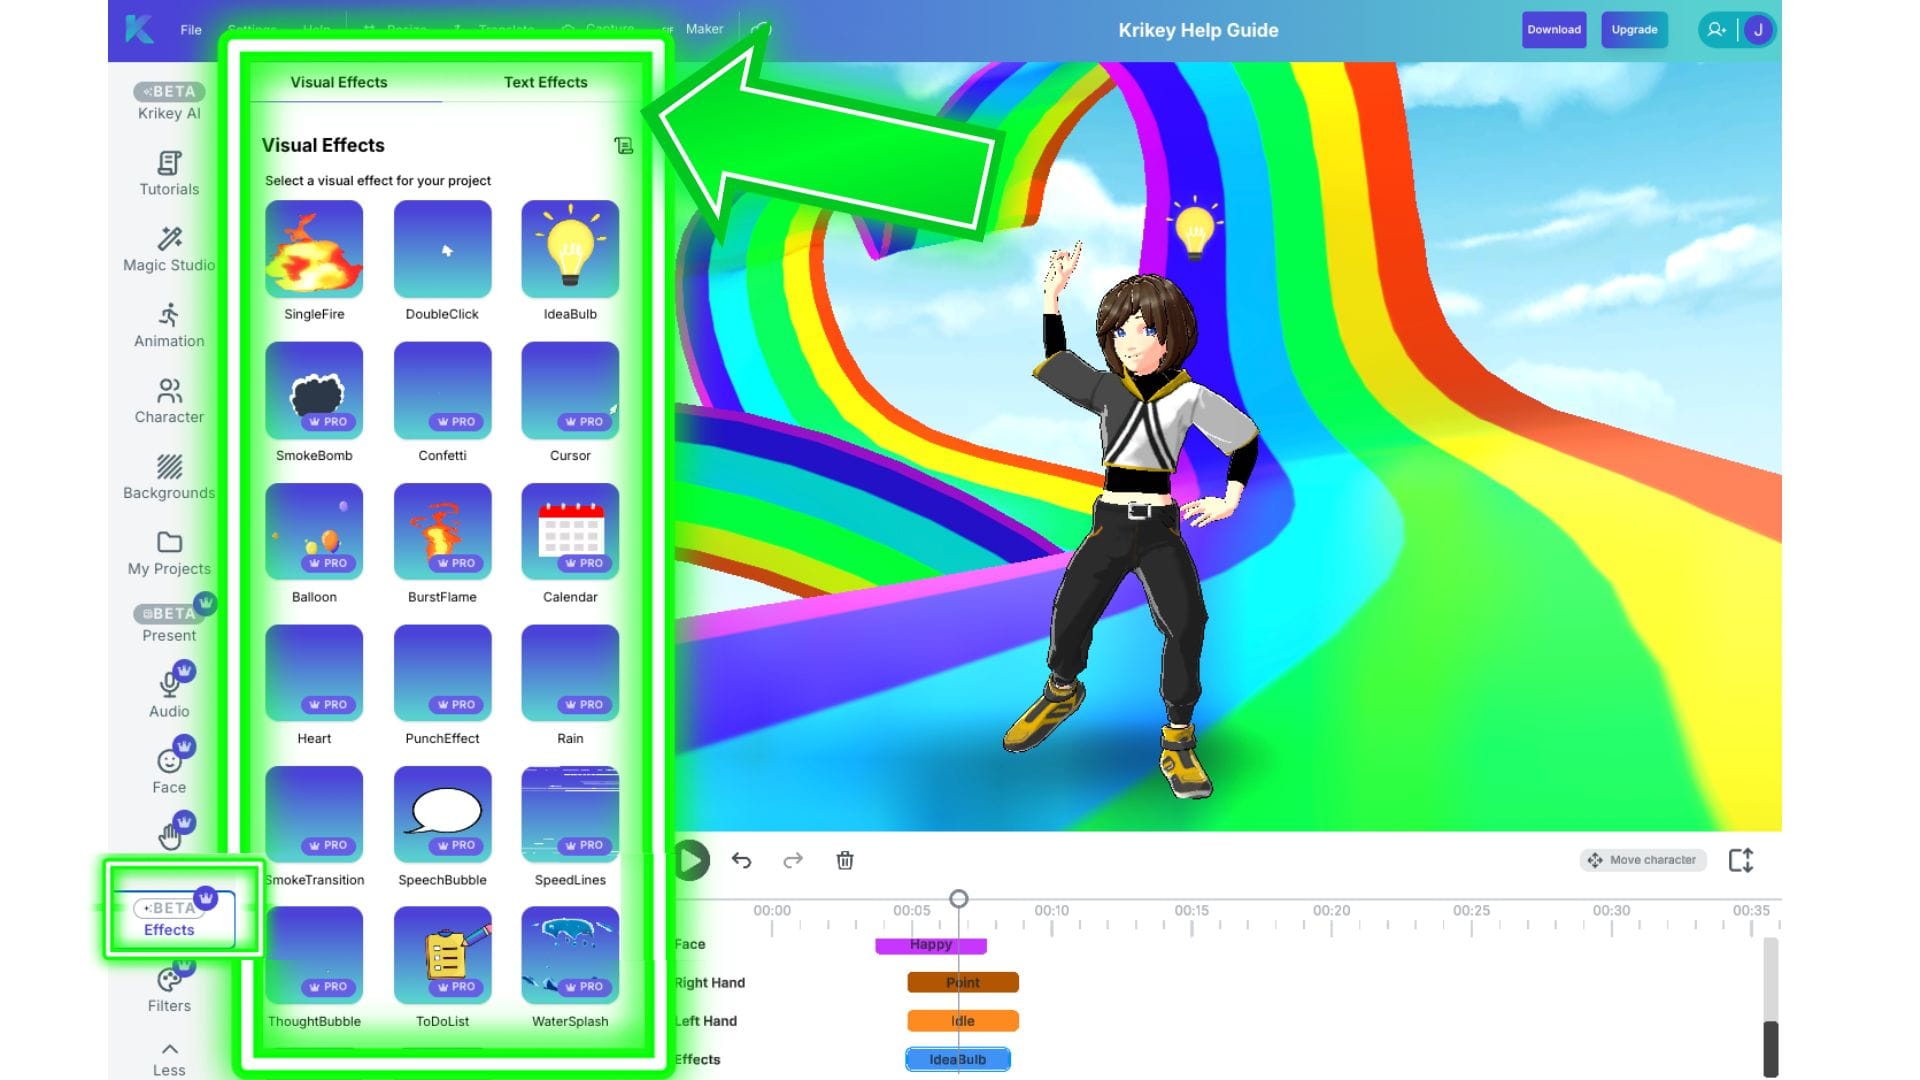
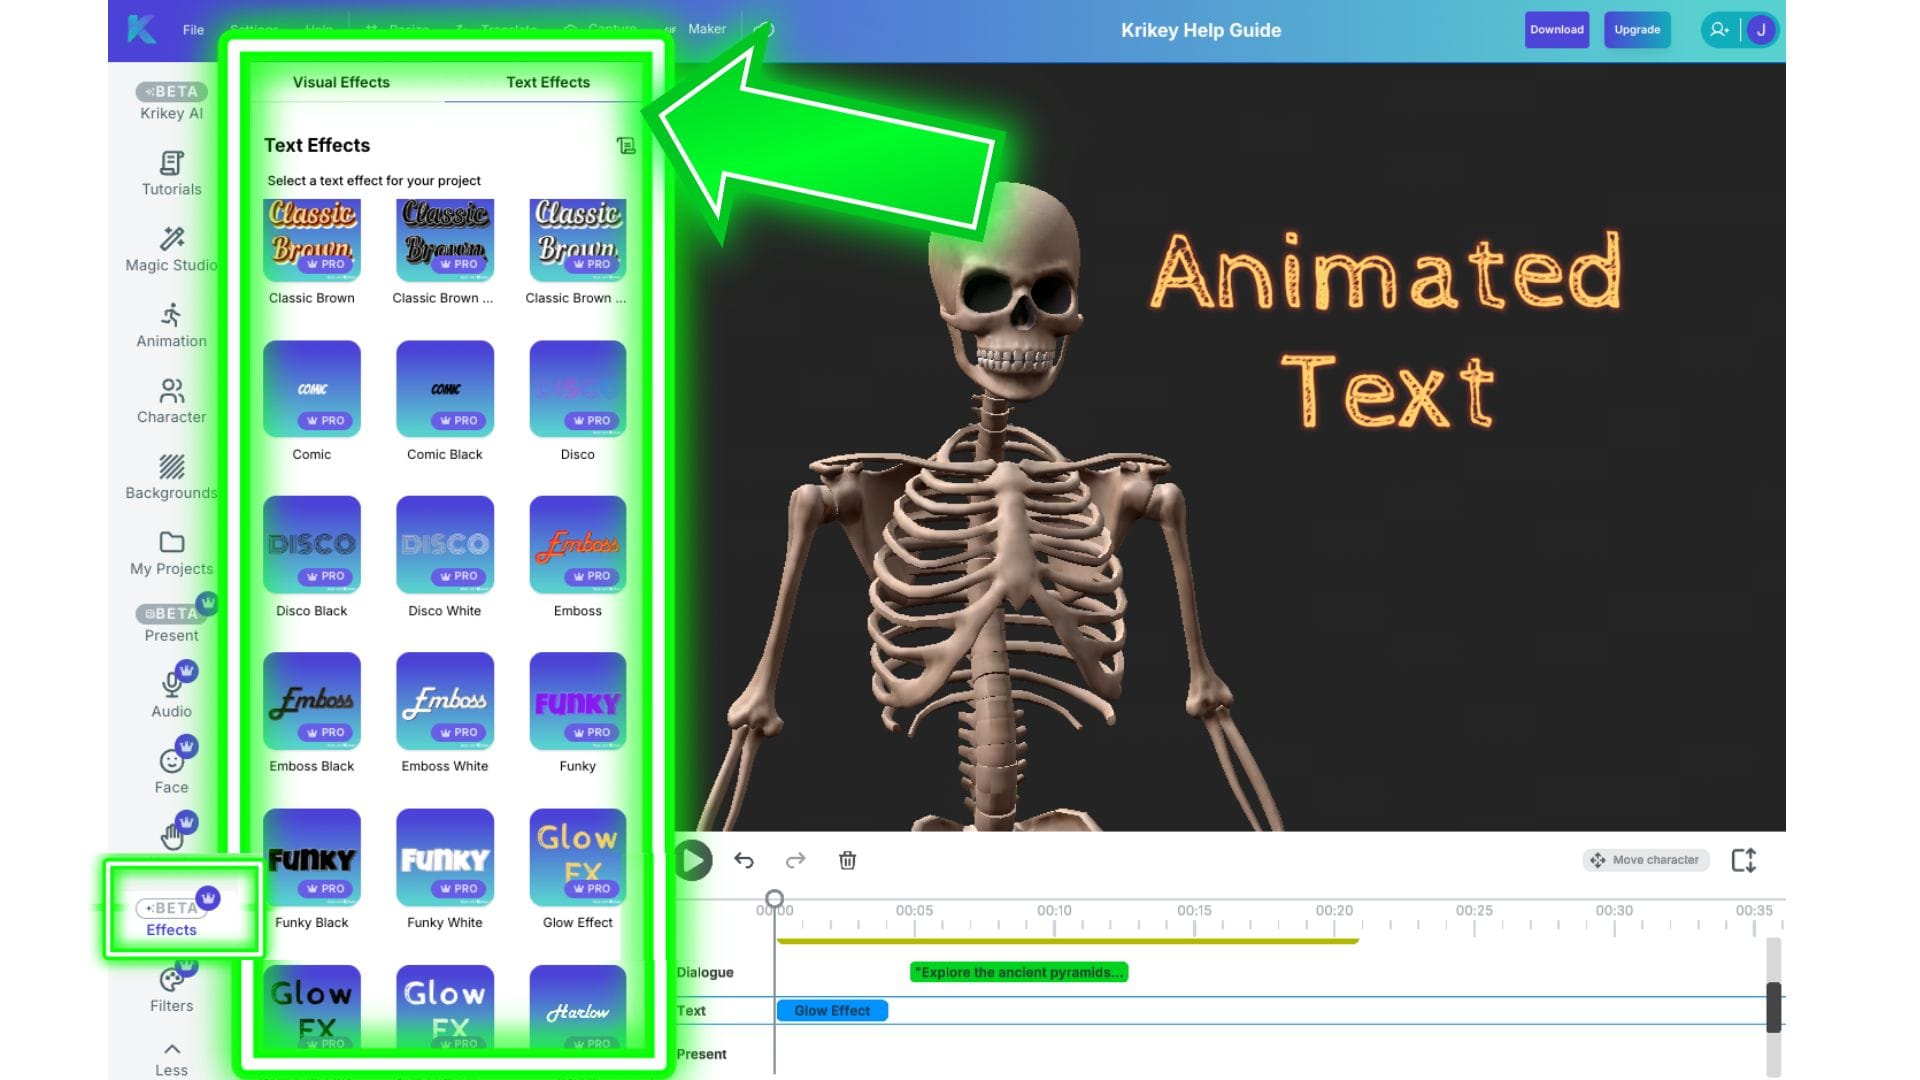
Effects
In the Effects icon you can control Visual Effects (VFX) and Animated Text Effects. Examples of Visual Effects include adding a mouse click, explosion, smoke, idea bulb, confetti, balloons, hearts, fire and more. Examples of Animated Text Effects include different 3D fonts and 3D text styles that you can add, resize and edit within your animated video. To access Visual Effects and Animated Text Effects, click on the Effects icon in the left hand bar of icons in the Krikey AI Video Editor.
Visual Effects
Below is an image showing where to find the Visual Effects menu inside the Krikey AI Video Editor. First Click the Effects icon, then click the Visual Effects tab.
Animated Text Effects
Below is an image showing where to find the Animated Text Effects menu inside the Krikey AI Video Editor. First Click the Effects icon, then click the Text Effects tab.
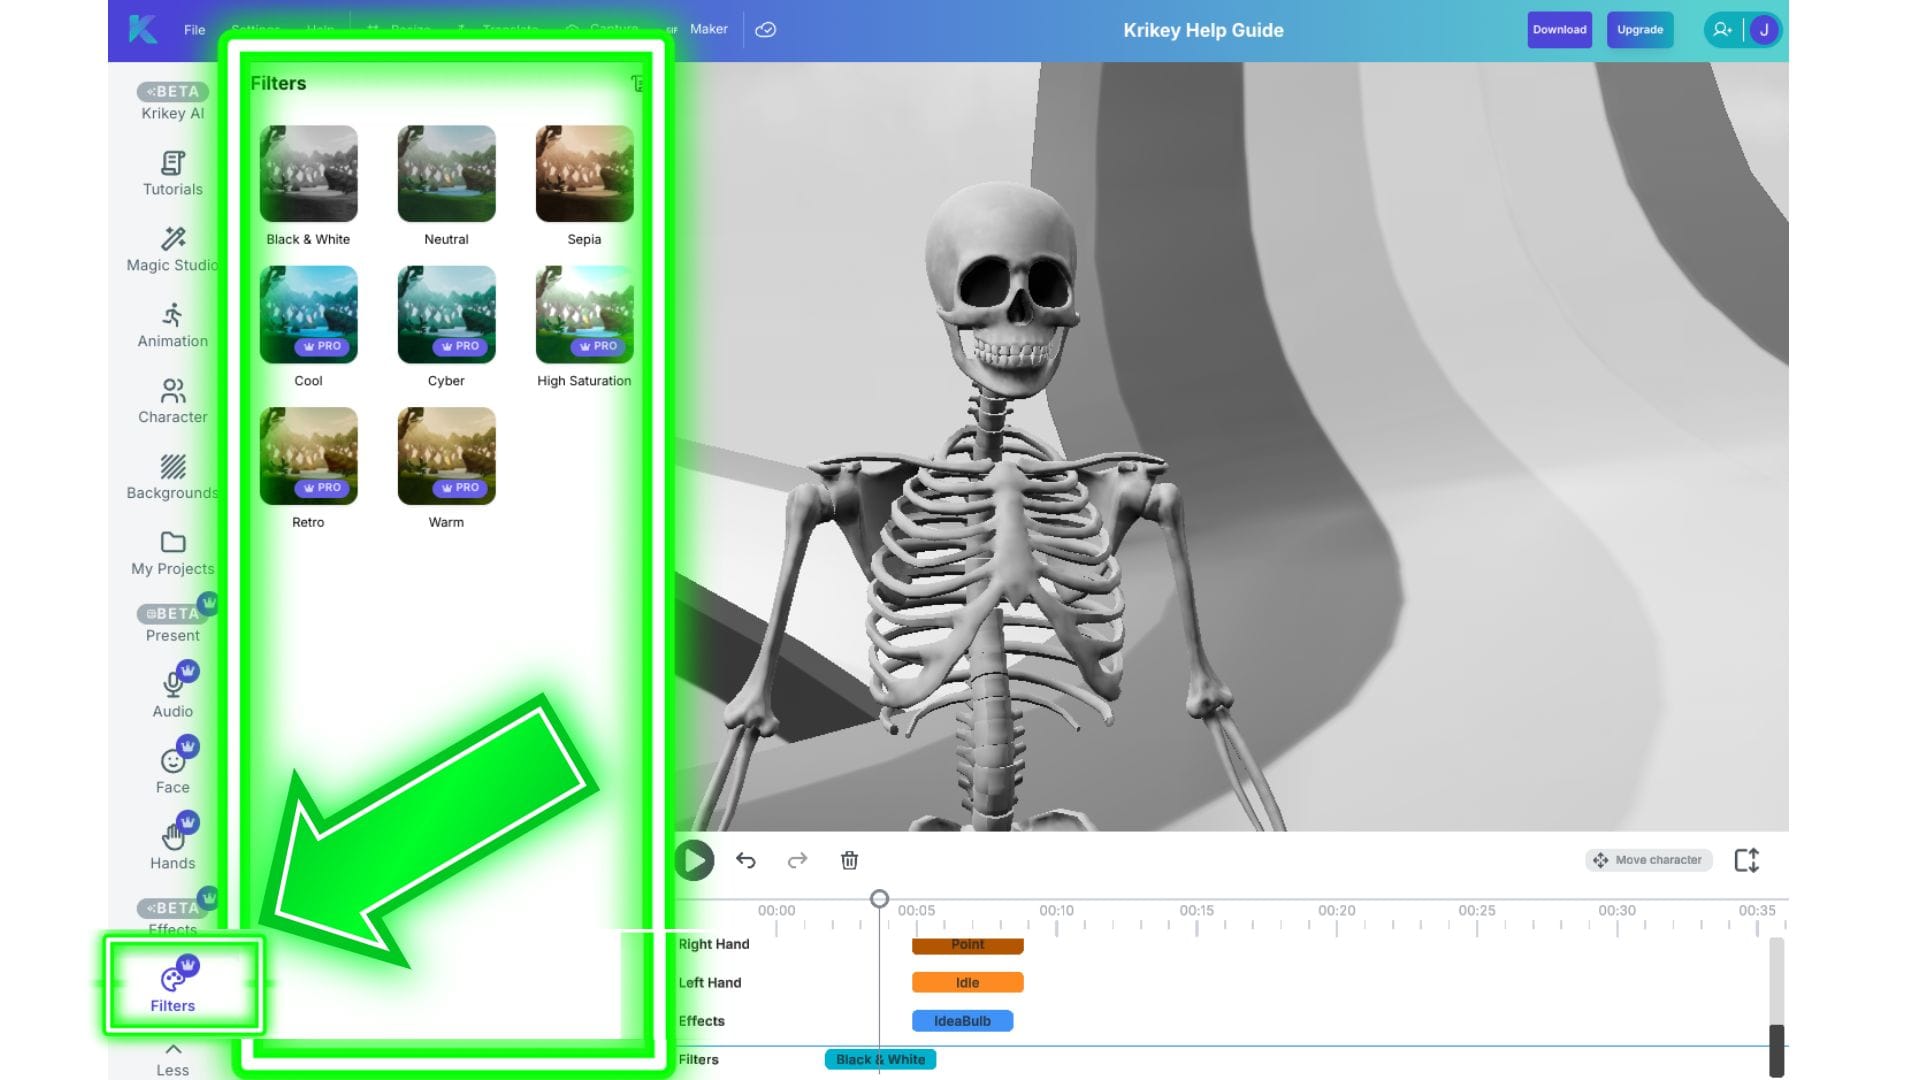
Filters
In the Filters Icon you will find different color filters that you can apply to the entire frame or scene in your animated video. To access this, just click the Filters icon in the left hand bar of icons in the Krikey AI Video Editor.
Video Editor Timeline
In the advanced options menu, Krikey AI has a video editor where you can see a track line for each element - from camera angles to animations to facial expressions and hand gestures.
This is the video editor timeline. Each horizontal track corresponds with a different feature - for example in the image below the tracks are listed out from top to bottom: animations, backgrounds, camera angles, lights, dialogue, facial expressions, right hand, left hand.
Play Button, Undo Button, Redo Button and Delete Button
Just above the video track line there is a Play Button, an Undo Button, a Redo Button and a Delete button. If you click Play, it will play back the video in the editor. If you click Undo, it will reverse the action you just took in the video editor. Redo will take the action again (if you accidentally pressed Undo!). You can also select individual clips on the video editor timeline and then click the Delete button, which is represented by a Trash icon.
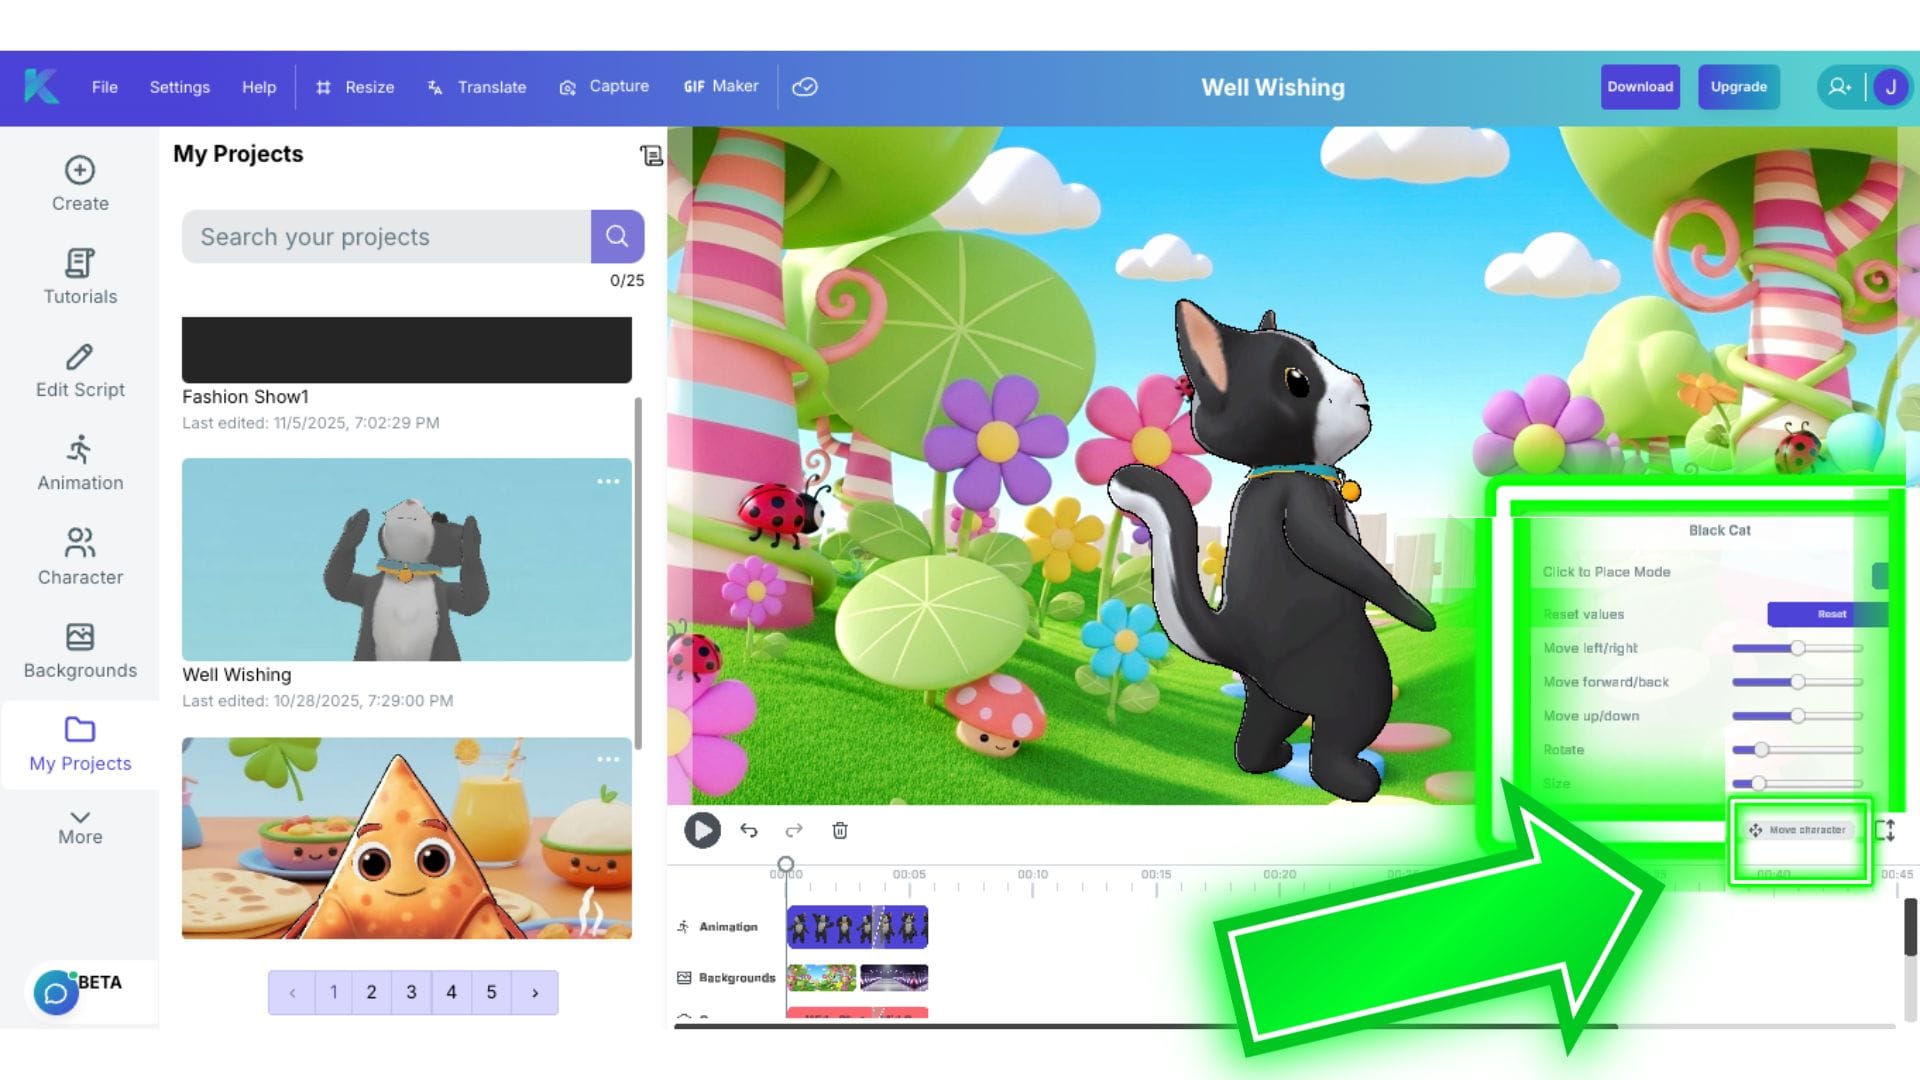
6. Moving Characters in 3D Space
You want to turn your character around to face left or right or start the video facing in a different direction - how do you move your character? Since Krikey AI is a 3D animation tool, you can actually rotate your characters in a full circle within your scene!
To move your character in the Krikey AI Video editor, click on the 'Move Character' button on the video editor. This will bring up a small menu with slider bars. These bars enable you to move your character left or right, forward or backwards and even rotate the character all the way around. The slider bars make it easy to move the characters - no math or coding involved to make your character move in 3D space.
To summarize, here's how to move your character:
- Manual and Smart Mode: Click "Move Character" (bottom right).
- Adjustments: Use the sliders to move the character Left/Right, Forward/Backward (Z-axis), or Up/Down. You can also rotate the character or change their size.
- Note: in Smart Mode, you can click anywhere on the preview of your video to move the character there. You can also click and drag the character to move them around the screen.
- Tip: Remember that moving the character manually affects the whole video; use camera angles for specific shot adjustments.
7. The Animated Podcast Tool (Sneak Peek)
Krikey AI features a specialized tool for creating cartoon podcasts.
- Access: Click the Podcast icon on the dashboard.
- Input Content: Describe your topic, upload a PDF, or paste a blog post link.
- Automatic Scripting: The AI generates a dialogue between two characters (Character 1 and Character 2).
- Edit Dialogue: Click "Customize Script" to rewrite lines or change voices for either speaker.
- Swap Characters: You can change either host (e.g., swap a human for a bear) at any time.
Krikey AI 3D Cartoon Character Store
Need to animate a cute cartoon tomato or a sweet strawberry? Maybe you need a clever black cat for a scavenger hunt video or a sassy samosa to promote your small business? Krikey can help! We just launched a 3D cartoon character store where all the 3D model cartoon characters are automatically set up for full body motion and lip sync capabilities using our animation software.
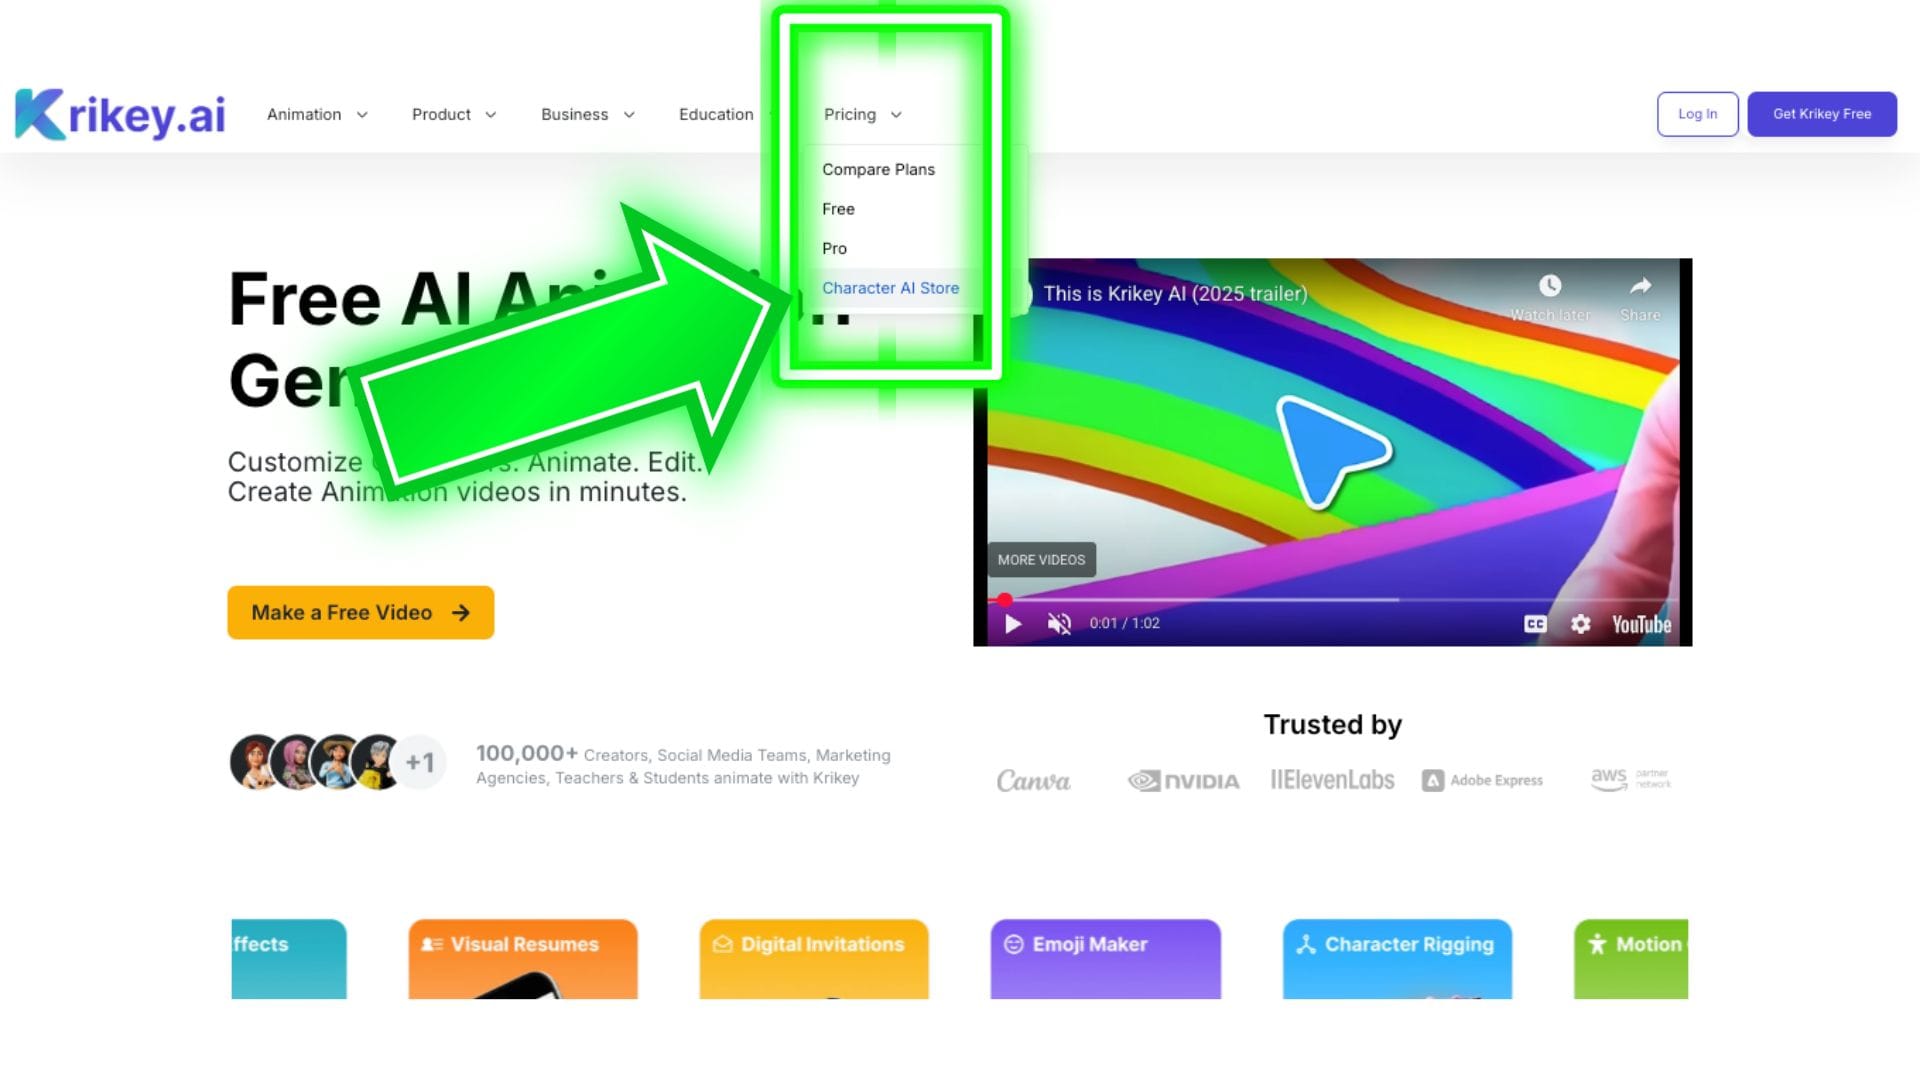
To access the 3D Cartoon Character Store, you can go to the Krikey AI homepage, then click on Pricing, then Character Store.
Once you are inside the Cartoon Character store, you can scroll down the page to see the most recent characters, featured characters and character categories. There are lots of options to explore before deciding which character you want to animate!
To see a full gallery of all the 3D models and cartoon characters that are available and compatible with our AI Animation software, click on the Explore button on the Character Store page.
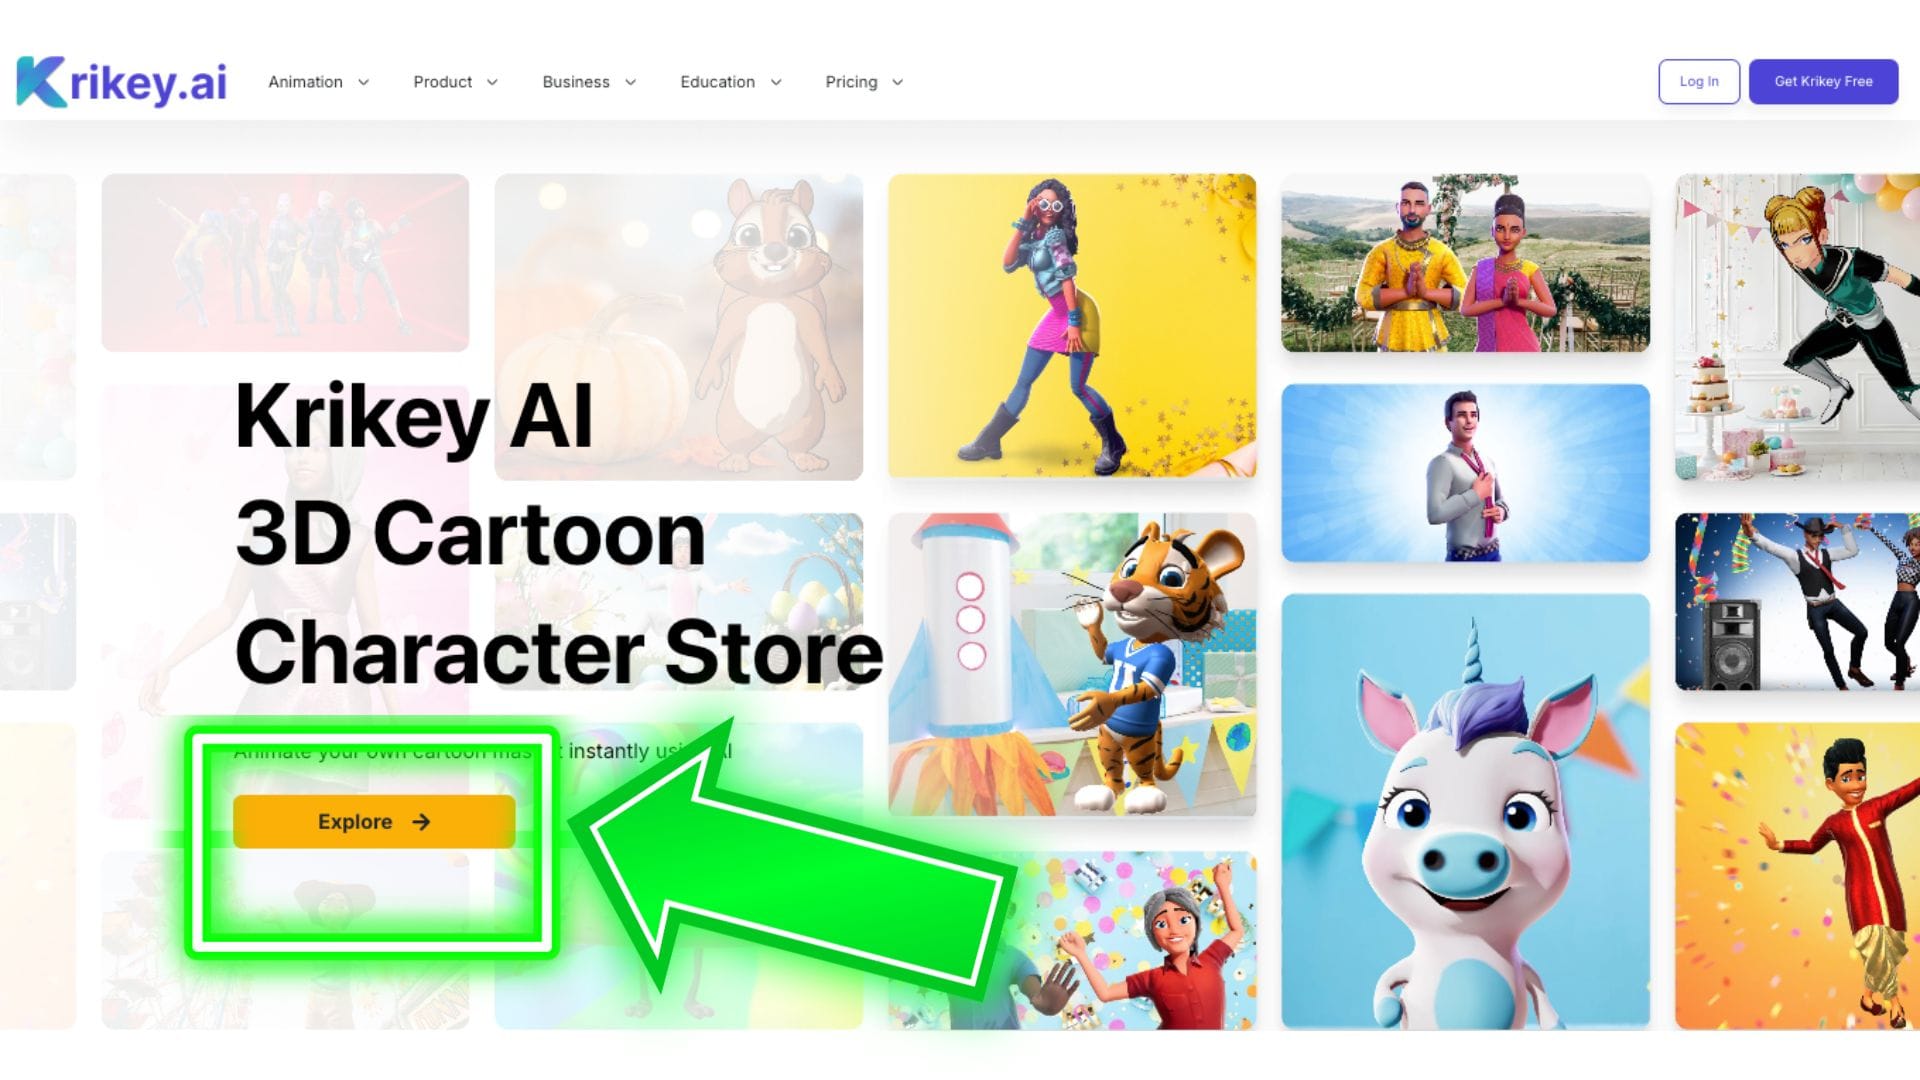
In the gallery, you will see all the different characters we have available. These are also visible inside the Krikey video editor when you click the character icon. The 3D character store has a dedicated page for each character and more information on different ways you can use the cartoon characters for education use cases, small business marketing, explainer videos, product demos, social media content, emoji stickers, posters, t-shirts and more.
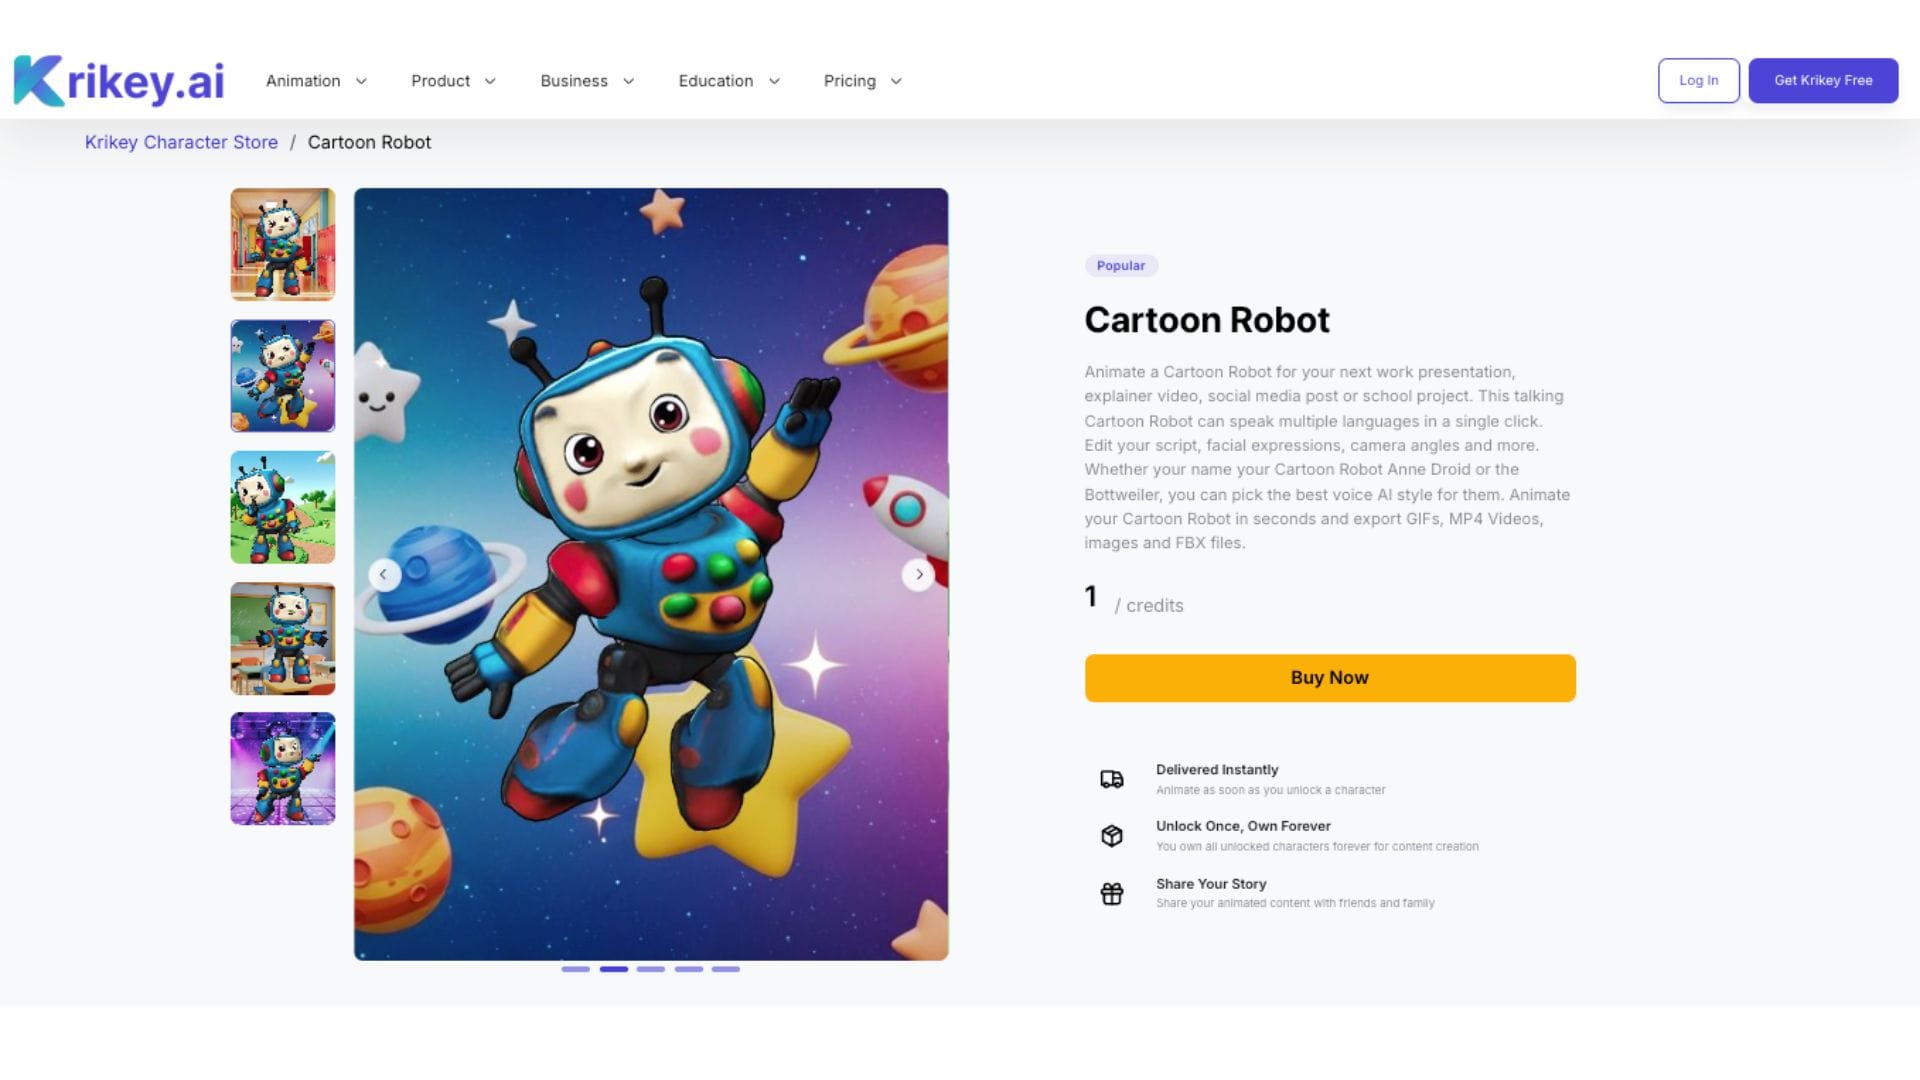
Here is an example of an individual cartoon character store page:
Support: If you have any questions, reach out to our team at support@krikey.com. We can’t wait to see what you create!
Frequently Asked Questions (FAQs) about Krikey AI Animation Tools
These are frequently asked questions about Krikey AI Animation Tools.
Do I have to download anything to use Krikey AI Animation Maker?
No, you do not have to download any software to use Krikey AI Animation Maker. Krikey is available on web browsers (ie; Chrome, Safari, Brave, etc.,) and you can access their Animation tools and Video editor at www.krikey.ai - no download required. For the best performance, please ensure you have a stable Internet connection and a Krikey account (Free or Paid).
How do I make a Krikey AI Account?
To make a Krikey AI Account you can visit www.krikey.ai and click Log In or Get Krikey Free. Choose your preferred sign in method and enter the Krikey AI Video Editor. Then you can begin animating a video and customizing characters right away.
What are the different pricing options for Krikey AI?
There are several pricing options for Krikey AI. To access the free plan, you can just sign in with your email and receive free credits to begin exploring the Krikey AI Animation tools. The Pro Plan is perfect for individual creators looking to make projects for work or home - or both! The Teams plan is excellent for small businesses, schools and non-profits looking to collaborate with their team to make animated video content. The EDU plan offers a discount for teachers and students. The Enterprise plan is best for larger companies or teams that require dozens of licenses or credits for a specific business purpose. Krikey AI is also available through Canva, Adobe Express and Amazon Web Services (AWS).
How do I upgrade to a different Krikey AI subscription plan?
If you need to upgrade to a different Krikey AI subscription plan, you can do this from the pricing page: https://www.krikey.ai/pricing - You can also explore more about the features of the Krikey Pro Subscription plan. If you have any questions or any trouble upgrading, please email support@krikey.com and we are happy to assist.
How do I subscribe to Krikey AI Animation software?
To subscribe to Krikey AI Animation software you can follow the instructions on our pricing page: https://www.krikey.ai/pricing - here you can select a plan and pay to subscribe on a monthly or annual basis. Once you are subscribed you will be taken into the Krikey video editor to begin your project with a fresh set of credits.
What are credits and how do I use them in Krikey AI animation?
Credits are used inside the Krikey AI Animation video editor. When you start on the free plan, you get 20 credits and when you subscribe on our current pricing plans, you can get up to 165 credits per month. Credits are used in the Krikey video editor for AI generation features - for example AI Text to Animation, AI Video to Animation, AI Script Writing, AI Image generation and more. You can see in the video editor below each button whether taking that action costs credits - and how many credits.
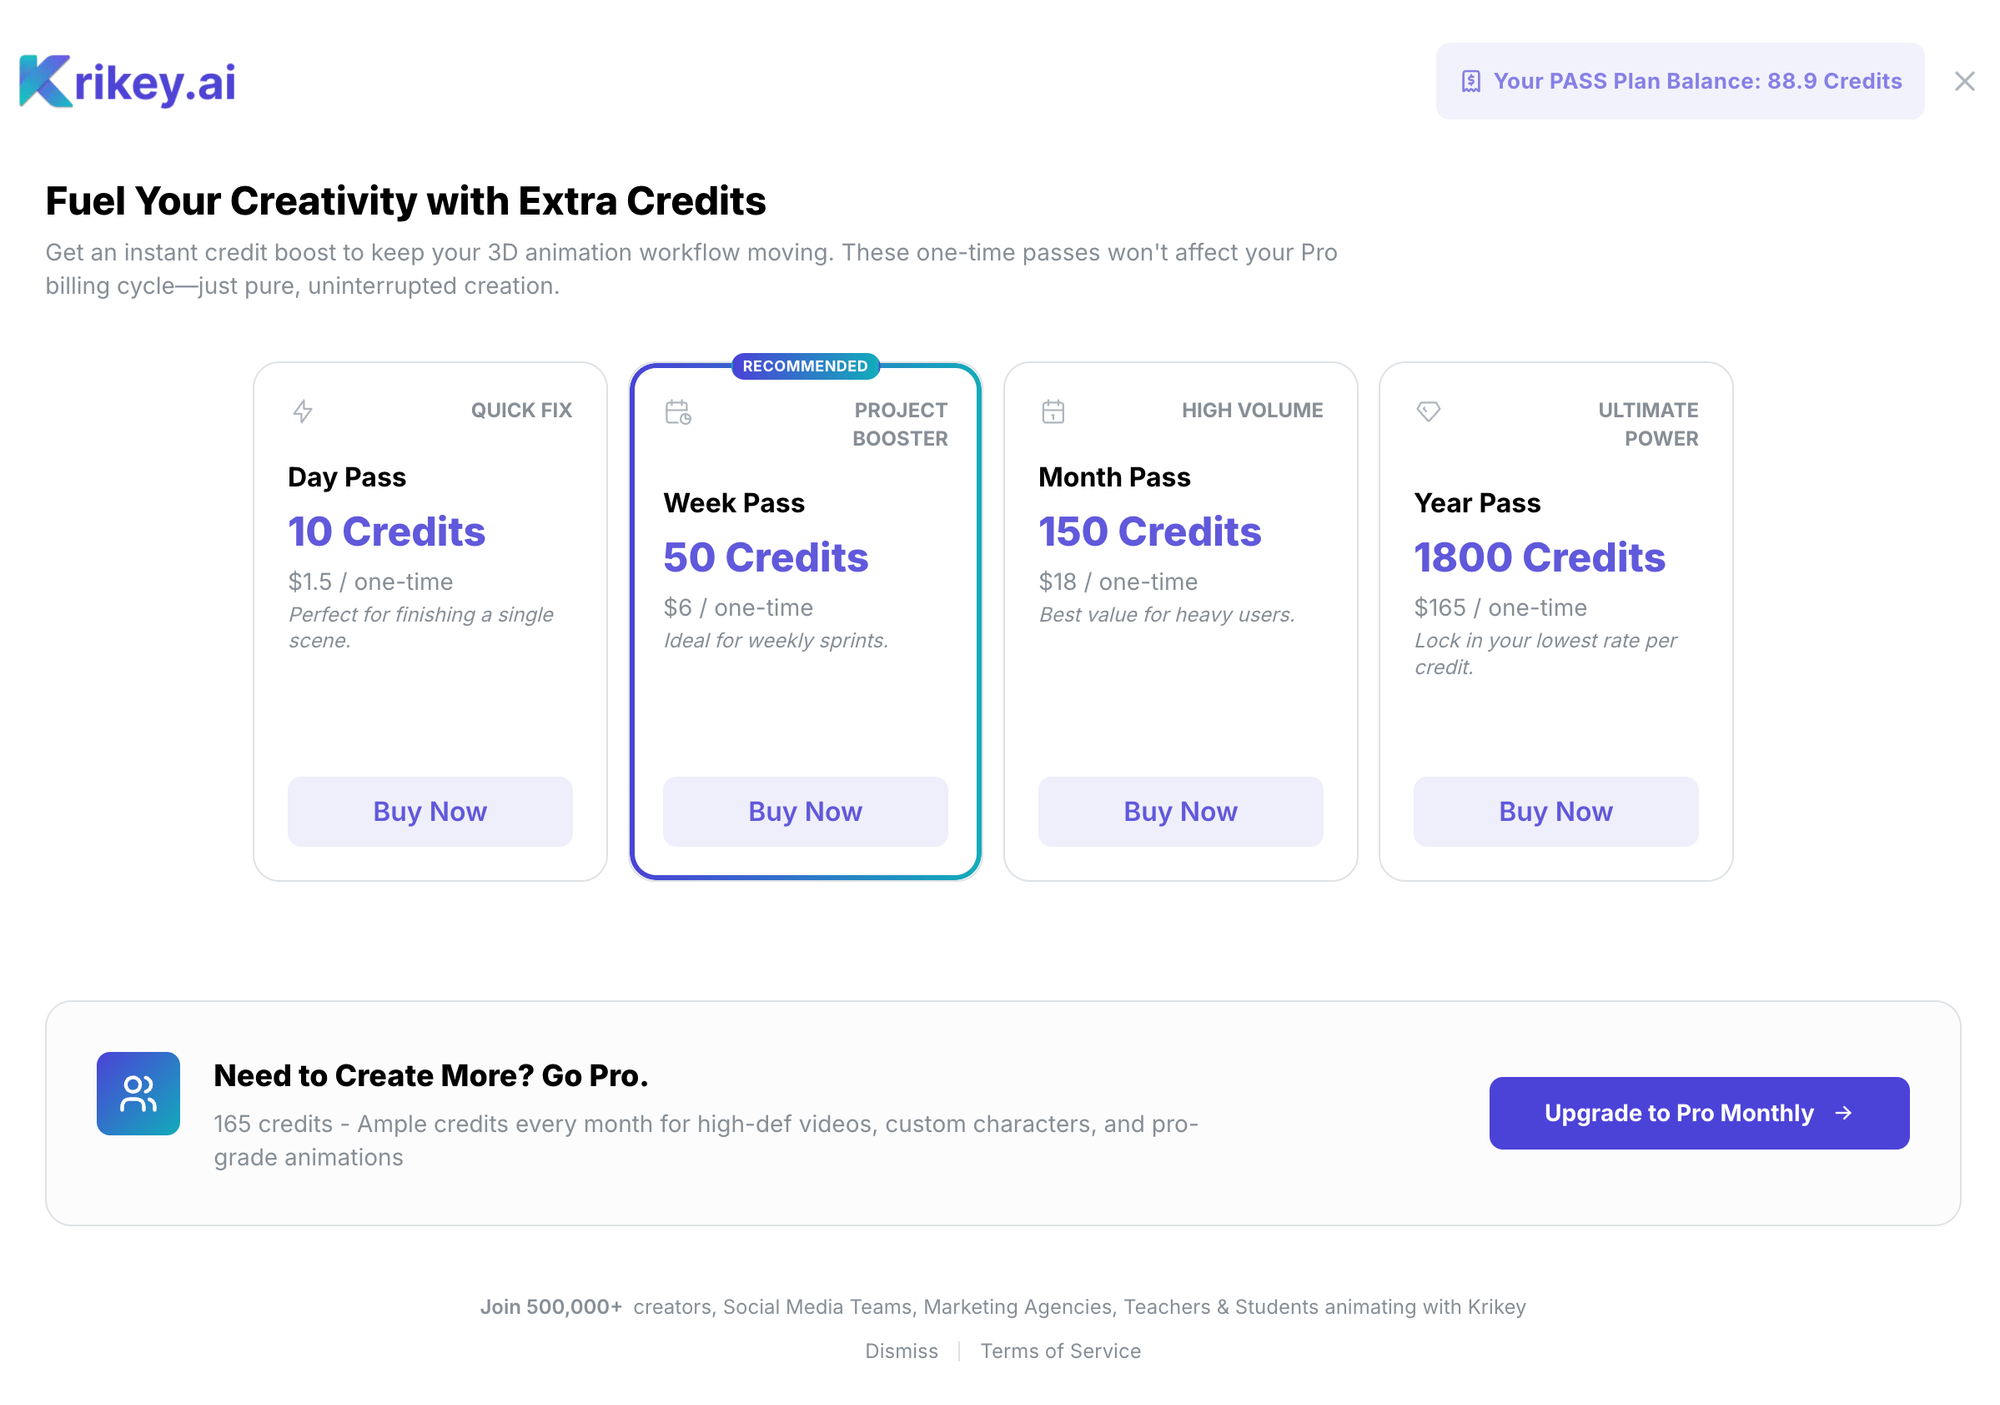
How do I buy more credits if I run out on the monthly subscription plan?
If you run out of credits on your monthly subscription plan, visit the pricing page or the upgrade button in the editor. Here, you can access our Day, Week, Month, and Year Passes - one time purchases that give you extra credits to complete your project!